Showing posts with label AndySkinner. Show all posts

Wednesday, 30 September 2020

Hallowe'en Tag Swap

 Good evening.

I am currently working on some "C" word stuff - presents for my family so most of my crafting time has been taken up by these but I did take time out to join in a swap. A Hallowe'en Tag Swap organised by "Artful Days" DT member, Jane Austin over in Facebook group.

My swap partner has now received her tag from me so I fell I can share on my blog now.


Starting with a plain grey board tag, I glued on some of the purple tissue paper that some of my Artful Days goodies arrived in. Never throw much away here lol
Dry brushed with acrylic paint when dry in shades of turquoise, titan buff and orange.
One of Andy Skinner's transfers from the "Curiosities" set applied (Creative Expressions). These are great when there is too much texture to stamp onto.


The MDF film strips and circle were given a touch of gilding flakes for added interest and colour.

The little coffin was handmade from greyboard waste from the back of a paper stack. Several layers cut to shape and glued together. Then painted with black and raw umber was wiped back before completely dry. The gold decoration is just a marker pen. 

Thanks for looking


Tuesday, 30 July 2019

Another Box - Kind o' Industrial

Hello again peeps
I have another box for you today. I have so many bits of MDF left over from an old DT position (company no longer trading) and I really oght to get them used up. What better way than to decorate a few boxes needing a face lift from their original, boring, basic unfinished wood look?
This one starts off using the scraps of the embossed card stock from my previous posted box, plus a few other plain scraps. There are "straps" of yet more card scraps; shaped with scissors and holes punched, rivets are little gems. A bit of stencilling with decoart crackle paste and Andy Skinner's "snakes web" stencil. Then a layer of burnt sienna paint, then dry brushing raw umber all over.

the MDF bits were given a touch of texture paste in places before being painted silver then given a coat of crackle glaze and then antiquing cream in patina green, raw umber and red oxide. The creams then wiped back.


Some micro beads then in a few places for "that" look you get when pipes haven't been touched in years.

The sides were all given a stippled gesso finish before painting in the same burnt sienna paint, then dry brushing with raw umber.


Yet again - I never leave the inside unadorned - more prima paper - this time the ledger paper stack.


A bit of wax round the edges to make sure the paint doesn't stick when closed. before putting the hinges and clasp back on.

Wednesday, 26 June 2019

Anthing Mixed Media for A Inky Mess in June

A day when I had to go to my place of paid employment so this post going up a bit late. Sorry guys and gals.

My DT piece for A Inky Mess challenge blog this month.
Yet another little Tando Creative kit. OK I'm biased. I just love the little kits they bring out. They are so versatile. So many ways they can be decorated. Lending themselves to covering with papers or loads of different mediums.

This is one of their little trinket boxes.

The top


The bottom


When opened out


There are little books inside but could easily be some trinkets
The top was decorated first with some crackle paste through a stencil (France Papillon) then given a few layers of Decoart paints. then some stamped and heat embossed elements Some metal embellishments and 3 little flowers. The swing clasp takes the place of a tied closure.

The inside and bottom were covered with Stamperia rice paper before securing the little box sides that had been painted and inked prior to fitting.

The little mini books are from another Tando kit - I cut these mini books to size so they would fit in.
Covered with a handmade paper (purchased, not made by me) that had been stamped with an Andy Skinner stamp (one of his new range in collaboration with Creative Expressions.) In each of the books I made 6 little signatures and glued in - as per the last photo.

I hope you like my project this month.
Please go look at my teamies' beautiful projects - out of this world, as usual. Then we would love to see what you make - just link into the challenge and we'll come visit your blog.

See you next time

Wednesday, 24 October 2018

I Haven't Been Idle

I know that not many projects have made it to my blog in the last few weeks - that's because most of them were gifts and swaps with other crafters and I didn't want to show them publicly until they had been received. Well most have now made their destinations so I feel happy about displaying on my blog.

First up is a tag I made as a swap within a group on facebook called Mixed Up Mixer. A mixed media tag with a Halloween theme.
This was the one I made

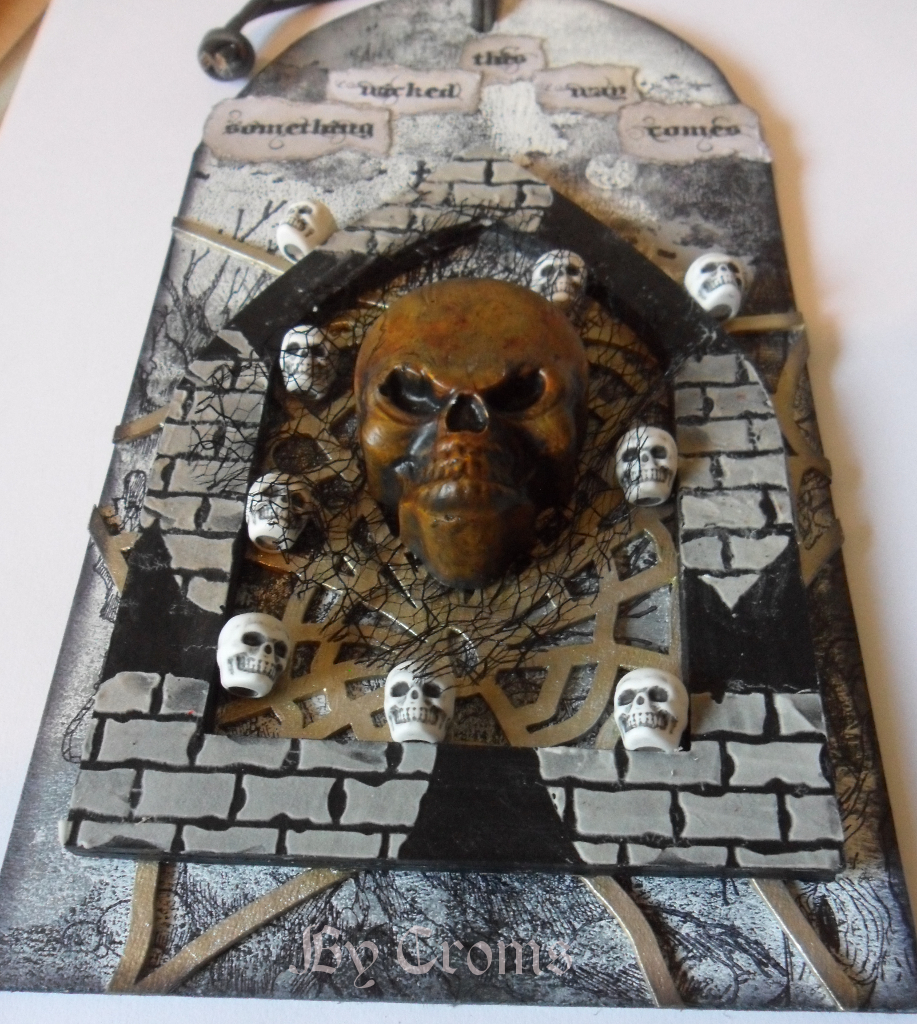
A greyboard substrate with paint and inked images layered with more (Tando Creative) greyboard cut into an arch and one of Tando's spider webs and (Tando Creative) brick stencil with (Decoart) modelling paste. Some cobweb fabric under a painted plaster cast skull. A few plastic skull beads to finish

I think the dimension is better appreciated here

My second Halloween themed project is now safely in it's new home
This time a little hanging


The skull was painted at the same time as the previous one, so is a similar colour. This time the greyboard substrate was brayered with paint, colours ranging from dark grey through to white. Then stamped with archival ink using stamps from Andy Skinner, high lighted with white gel pen.  The ornate die cut is one from Tonic's mixed media range cut from greyboard. Painted black then a variety of interference paint colours. Layered with another cut from the same Tonic range again brayered with paint then script stamped. The cobweb diecut to give another element in my scene.
Finished off with some white artstones and some twine to hang the picture with.   

Thanks for looking

  
I'd like to enter the projects as one into the challenge at

Bleeding Art Challenges - Halloween Mixed Media

Wednesday, 23 May 2018

I am a Winner .......... yayyyyyyy

A very good morning/afternoon/evening to you all. Are you all sitting comfortably? This is going to be a loooooooong post.

If you have been following any of my latest projects on this blog, you will have seen that a number of projects were aimed at the Illusionary Artists challenge being staged, The task was, using either France Papillon's or Andy Skinner's stamps in the Chocolate Baroque Illusionary Artists range, create a project (or seven). Link the project into one of several spots and be judged by both artists. The prize was a feature blog post on the respective artists blogs. No mean prize considering the bragging rights this affords as both are amazing professional artists (as well as being lovely people) and I have had the greatest pleasure in meeting them both and taking more than one class in the Ministry of Mixology weekends.

Well I am ecstatic, to say the least. France loved my little mini book featuring Auntie Margo and co and it was this project that secured this fabulous prize for me.
Please click the link above to read more about this project.

So what new projects to feature in this post on France's blog

I made a few, trying to feature not only the stamps but also the fabulous stencils designed by France and produced by Tando Creative. The first two projects because I wanted some storage for some of my goodies.
First was a little book case to house the mini books I'd already made. 


Decorated with crackle paste through the "Rockformation" stencil on the outsides before painting and inside paint through the "crackled" stencil on back and shelves and paint through the "torned circle" on the insides and stamped with crackle stamp from "Rock'n Rust" plate.

Next storage for those stencils.....or for the journals that France both encourages, teaches and inspires with the help of her special team of butterflies both on facebook and her blog.


Purely functional with just the moths from the "Creepers and Crawlers" plate. Stamped onto some brusho-coloured watercolour paper and cut out, with a bit of interest inside with heat embossed owls from Stampendous.

The purely functional projects done - some real playtime.


This acrylic tag went in the box of some very special items to France. I must give a shout out to Nikki Killinger for the backwards crackle technique. Such an awesome way to decorate any clear substrate.
On my tag I used the boy from "Auntie Maud & co." and the little hearts and sentiment from the "perfect words" plate. 

Another tag - just because

From the Tando kit "France Papillon Tags and embellishments", and using "Rock formation" and "Rusted rivets" stencils with crackle paint before painting. A dusting of stampendous embossing enamel. The newt was cut out from tissue paper and adhered with matt medium. The moth was stamped into hot glue, cut out and coloured with mica powders. Both stamps on the “creepers and crawlers” plate. The sentiment is from the "Perfect words" plate stamped onto part of the embellishments kit that was painted, treated with one step crackle and then English red oxide antiquing cream applied and wiped back. Rusty wire "holds" it all together with a little help from some 3D glue.

Finally 
as previously mentioned, France is very inspirational in the Art Journaling field as well as Mixed Media. It is because of her that I actually started my very first art journal after all these years of not understanding "WHY". Anyone who has not done any art journaling and is still dithering really needs to go and get stuck in. The “A layer a day, a spread a week” approach is really working for me and I know I'm not alone. I won't bore you here with my spreads done so far but one of the prompts was "Shadow of the morning". This next piece evolved whilst playing with decoart sosoft fabric paint with this prompt in mind.


You can see the "rusted rivets", "circles", "torned circle", "crackle" and "rectangles" stencils all being used before stamps from "Rock'n Rust", "Perfect Words" and Auntie Margot and co" make an appearance. This piece of fabric has been used to cover a 3x3 signature booklet made from A4 envelopes I have, that were bound, coptic style.
the fabric adhered to the envelopes and machine stitched round the outside

I hope you enjoyed looking at these projects almost as much as I enjoyed making them and I thank you for your endurance.

Once again, I want to thank France for not only choosing me as her guest on her blog but for being such a wonderful and inspiring lady.


All the paints/mediums are from Decoart 
(except the brushos and mica powders)

All the stamps, stencils and more can be found in France's shop


Thursday, 5 April 2018

Broken Time

Morning all
Managed to escape the kisses and cuddles from our dog Nala for 5 mins. As much as I love them, it's hard to type a blog post or craft when 20kg of staffie is needing her fix of her hoooomans on a lap.

Soooooo, what have I got today?
A little plaque. Substrate and bits from Tando Creative with the stamped words from the Andy Skinner side of Illusionary Artists stamps from the Word Up plate made by Chocolate Baroque and the background stamp of the Clock Collage from Stampendous as is the Aged Ochre embossing enamel on the word frame. Decoart paints/mediums used.


The base and frame were first painted with black chalk paint then crackle then vintage and timeless paints respectively.  A little bit of rubbing back to show that black a bit more before stamping the clock collage in sepia archival ink.
The cogs and "clock hands" given various coats of paynes grey and quin. gold media paints. The clock hands started life as keys but as I had no clock hands, I improvised.

The clock dials had texture paste used before the paints.

The word plate - the frame was triple embossed then Andy's word stamp from the stampendous "steampunk" set pressed into the hot enamel with versamark.
To get those words to fit nicely with more control , I pressed the painted greyboard piece onto the stamp as opposed to stamping onto substrate. A couple of brads to complete then all glued together.

Thanks for looking

Sunday, 1 April 2018

A Toxic Plaque

Good afternoon and a Happy Easter to those that celebrate it.
Crafting is not only enjoyable for me, it also forms part of my own pain management. Drying time can be made to fall into those periods when I need to lie down so I have a win win situation most of the time. For those out there, and I know there are many, BIG gentle hugs to you all.

It's been a week since my last visit. I've been busy but can't share my makes just yet as they have not been received by the people they are intended for.
The piece I am going to share with you came about by chance really. I was searching for a particular roll of ribbon that I need for another project and came across a little package of MDF and grey board that was in a goody bag at one of the Ministry of Mixology retreats that I love going on. This bit donated by Tando Creative. It seemed to good an opportunity to put it to some use as this ribbon has still not come to light.


I started off by damping the edges of the greyboard and distressing thoroughly. Then left to dry.
All four pieces were painted with Decoart black chalk paint and when dry some crackle medium applied to some areas. Lighter coloured chalk paint in different colours applied to all pieces.
Rust effect - more paints. The stamp set I used is from Andy Skinner's stampendous range - "Toxic". It felt good to go back to some older stamps for a change. Why buy stamps if they are going to be used a few times then put away, never to be seen again, just because newer toys are at hand?
Some close ups of those distressed edges - they are solid now because I've sealed with ultra matt varnish.


The scratch and "toxic" stamps used here can be clearly seen.

The rivets are just aged brads. 


The finished plaque can be hung up with the rusted wire. The smallest piece is going to hang funny because it's already lost two rivets so no - I didn't mis-stamp.


Thanks for looking 

Friday, 23 March 2018

Time of En - Light - Enment

Evening all. Just a quicky post tonight.

It has probably become apparent over the course of my last few posts that I have recently bought a set of stamps from the Chocolate Baroque range, Illusionary Artists. These stamps are the brain child of a couple of fabulous artists - France Papillon and Andy Skinner - and I love them. I am on a private mission to use at least one stamp from each of the plates I have before the end of the month.

This post is dedicated to the "Tech Trauma" plate.


A media board from Tando Creative formed the main substrate. All paints/media are from Decoart. First I sealed the board with gesso then painted with paynes grey. Also the remains of a clock face from a previous project. The media board given a coat of weathered wood then crackle paint. Just love the crackle effect of these two mediums together. Before any bits could flake off, I coated with matt medium. Then came the quin gold paint followed when dry with an edge painting of burnt umber. Then stamped with the image. Sealed with matt varnish.


Whilst all this was going on there was obviously some drying time that the other pieces could be treated. The clock face painted with patina antiquing cream, wiped back slightly when dry and a touch here and there of yellow iron oxide then sealed with matt varnish.


The lantern was painted with metallic gold and then black e-z stroke from my years old stash. More matt varnish.

The light from the lantern was effected with titan buff slightly watered and a dab of hansa yellow light.
All glued together before adding the computer generated words.


I wanted the font to be all the same so elected for this format rather than use any of the words in the other sets I have. (A bit of a pun going on here I know)


Thanks for looking


I will be submitting this piece as well to my application for guest DT for either Andy or France. If anyone is interested you still have a week to apply.

I'd also like to enter this piece into the challenge at
A Inky Mess - Anything Mixed Media Goes

Sunday, 18 March 2018

A Mini Book - first of three

Morning all. Nearly at the spring equinox and snow falling. No - it's flying horizontally with the wind not falling vertically. Not at all nice out there. Any excuse to spend time in my craft room.
I have the first of three little bendy spine mini books from Tando Creative today. Initially it was a slow process because of drying time for the front.

Modeling paste was applied to the primed grey board book cover and when just dry enough, two of the stamps from the Gothic Grunge plate from Illusionary Artists (Andy Skinner), produced by Chocolate Baroque were pressed into the paste. Then the waiting game before painting

Front cover
I wanted to give the impression of a couple of old terracotta tiles. Various colours from the Decoart media range were used

Inside cover
 Needed to be flat because of the pages. Another couple of stamps from the Gothic Grunge set and a couple from the same range but this time the Spook plate.
Inside with pages
 The drying time for the front was used productively though - making the signatures for the inside. 7.5cm strips cut from 12in Prima paper. folded in half and then sides to middle. taped on these short sides in the middle.
spine front
various embellishments and crystals from stash


spine back

spine centre

One down, two more to go. What style will emerge from my desk next? We''ll have to wait and see.


 I'd like to enter this little mini book into the challenge at
Dream in Darkness - March challenge - anything goes but no cute
Creative Artiste Mixed Media - Anything Goes
Also, the application for guest DT for Illusionary Artists

Wednesday, 14 March 2018

Creepers and Crawlers

Morning all
I'd like to share my second project using the Illusionary Artists  range of rubber stamps from Chocolate Baroque. This time the Creepers and Crawlers by France Papillon.
 I mentioned a couple of posts ago that I had a few boxes I wanted to change up - this is the second of the bunch. Decoart paints and mediums used throughout.
As always, 3D items mean a few photos as getting all the detail in one is impossible.
I wanted to show the water creatures at the different levels they would inhabit in the wild.


and the top


The stencil used is also one of France's "crackled" randomly applied using modelling paste over the box previously painted white. Then painted.  For those that want to know the paint colours used - Cobolt Teal Hue, Cobolt Turquiose Hue, Phthalo Green-Yellow and Green Gold. 
The octopi and newts were stamped in archival inks onto kitchen roll and fussy cut out and applied to the painted box with matt medium. Some crackle glaze applied over random areas of the top and  down the sides. When dry, white antiquing cream applied and wiped back later with a damp cloth.
All coated twice with ultra matt varnish to seal. 
The dragonflies were stamped 2 times each onto acetate with stazon and painted on the reverse with interference paints. Cut out and paired and wound beaded wire around the body. (Inspiration from Veerle Moreels where she wound wire all round the dragonfly) before attaching to the top of the box.

Thanks for looking

I'd like to submit this box into the guest DT call for Andy Skinner and France Papillon


Monday, 12 March 2018

Spook

Evening all. I'd like to share another little project today.
A little background info - skip if you want. A while ago, France Papillon and Andy Skinner formed a collaboration under the name "Illusionary Artists" and the stamps they designed are now being made by Chocolate Baroque.
I was fortunate to be able to buy them at the last Tando Creative retreat at the end of February and although I have used the odd couple of words in another project, the collection has largely gone un-inked. That is about to change.
The first set to be cut out and used is "Spook" by Andy Skinner.
I have made a little triptych using greyboard cut with a sizzix arch die.


Skulls cut apart and mounted

Each arched piece was first gesso'd then a layer of pattered paper stuck on.
A template made from the die for applying the crackle paste. Then the boring part of letting that dry. I wanted large cracks so had to be applied thickly. This was then coated liberally with matt medium so that the cracked pieces did not fall off.
Then washes of plain quin gold then a mixture of paynes grey and quin gold.
The moon was created by dipping the top of a paint bottle in titan buff and "stamping" it on the centre piece. 
Whilst this was drying off, the images were stamped onto velum and coloured on the reverse with pencils before fussy cutting out. The pieces were joined using jump rings and scraps of card attached to the back of each arch so they would stand up.
The goblin has only been attached at the base and skellie king at the feet and one elbow to give more of a 3D impression.

Thanks for looking

I'd like to enter this triptych into the challenge at 
Dream In Darkness - Anything not cute