The fourth 31 day long extravaganza of the Smeared and Smudged forum kicks off tomorrow. 31 days of Halloween inspired art in which I am going to try and keep up with. Projects ranging from the simple quick makes to those a little more time consuming. The only requirement for the hop is that they have at least one stamped image somewhere. Prizes galore along the way from some fantastic sponsors. For full details you'll need to visit the forum.
Watch this space!!
Sunday, 30 September 2012
Thursday, 27 September 2012
Not Long Now
We're counting down the days now to when the EDT of Rick St Dennis begin to bring you not only, (hopefully) some great inspiration with some amazing images but also the chance for you to show us what you can do as well. The challenges start next Friday! So don't forget to come back and join in the fun. There's going to be some fantastic images to win for some of you lucky people. We have also got the sponsorship of the lovely Teri of Delicious Doodles offering up a prize for another lucky contestant.
In this exciting lead up to our New Challenge, Rick himself, is also giving away 2 FREEBIES.
They are available only here on Saturday and Sunday this weekend. After that they disappear into his Etsy Shop.
Want a taster?


In this exciting lead up to our New Challenge, Rick himself, is also giving away 2 FREEBIES.
They are available only here on Saturday and Sunday this weekend. After that they disappear into his Etsy Shop.
Want a taster?


To see these properly and to get them for your own collection, you'll have to come back on Saturday!
Don't forget - they're only available for TWO DAYS.
Tuesday, 25 September 2012
I Used Pink!!
Not the colour I reach for as a normal course of events, is it?
Colouring this image for a friends birthday card - Pink seemed to be the natural colour to choose for the sash. What image?.......this one........
 This little beauty is Esmeralda. Just one of the beauties available at Rick St Dennis' Etsy store. See what I mean about the pink. Had you going maybe? Thinking I might go for something a little less bold?
She's coloured in using promarkers, a dab of gel pen for her jewels with just a dash of gold glamour dust on her shawl.
Then to give her a home for the card I needed to make for a friend, I used the sketch over at A Die For A Sketch. - Requirement that at least one die is used
 A slightly different angle - trying to reduce the glare
 Ingredient were
Colouring this image for a friends birthday card - Pink seemed to be the natural colour to choose for the sash. What image?.......this one........

She's coloured in using promarkers, a dab of gel pen for her jewels with just a dash of gold glamour dust on her shawl.
Then to give her a home for the card I needed to make for a friend, I used the sketch over at A Die For A Sketch. - Requirement that at least one die is used


labels 8 nestie
BP basic grey - love me tender range
gold miri, Red lace, hot pink and old gold ribbons. gold glamour dust and red pearls from stash
home made pins
Stamped sentiment, heat embossed in gold
The pins used beads from an old recycled bracelet
I am entering this into the challenge over at
A Die for a Sketch - their sketch
Monday, 24 September 2012
Blackbirds for Smudgy Antics
The second of my regular Monday posts this time for Smudgy Antics. The theme this week is, you guessed it, BLACKBIRDS. Simple enough challenge?
Just incorporate a black bird of some type, real or mythological, and use a stamped image somewhere on your project
You may use rubber, clear, or digital stamps.
See told you it was easy!!
Another 3-D project from me. This time - an altered cigar box.
 OOpps forgot to close the lid down properly but this is the view from one of the corners
 Front view
 Top view
The box was covered with card that had been well and truly scrunched up before sticking down and painted.
The top was also dry embossed with one of the Halloween folders I have. The base of the box was surrounded by TH Iron Gate die cuts. Sage green card and dry brushed with burnt sienna paint.
The images are all from the Smeared Ink, Quoth the Raven set. I am lucky to have the rubber but the digi set is available from here. I heat embossed all the images in black onto pearlised grey card before cutting out and attached using silicon glue. Black feathers under Mr Poe's wings, just because!
The other members of the DT have waved their magic wands and produced some amazing pieces. You need to go look. Then when you've finished yours, come along to Smudgy Antics and show us
Just incorporate a black bird of some type, real or mythological, and use a stamped image somewhere on your project
You may use rubber, clear, or digital stamps.
See told you it was easy!!
Another 3-D project from me. This time - an altered cigar box.


The box was covered with card that had been well and truly scrunched up before sticking down and painted.
The top was also dry embossed with one of the Halloween folders I have. The base of the box was surrounded by TH Iron Gate die cuts. Sage green card and dry brushed with burnt sienna paint.
The images are all from the Smeared Ink, Quoth the Raven set. I am lucky to have the rubber but the digi set is available from here. I heat embossed all the images in black onto pearlised grey card before cutting out and attached using silicon glue. Black feathers under Mr Poe's wings, just because!
The other members of the DT have waved their magic wands and produced some amazing pieces. You need to go look. Then when you've finished yours, come along to Smudgy Antics and show us
In Chains for HDH
It's been one of "those" weekends here. So much to do and never enough hours in the day. It doesn't help when Mr Mojo decides to take a wee break. I looked high and low for him but he's definitely packed his bags and disappeared. I still had to complete two DT pieces, oh well. I struggled on without his help. Apologies to anyone that expected more from me.
Enough of my ramblings and on with my piece for Haunted Design House

 4 layers, flipped for the other side so it's all neat and tidy and the cage can be viewed from both sides - coloured with promarkers before fussy cutting each out, the top 2 layers on each side had the wings cut away to add dimension. This process also added stability to the image for the next process. Adding the handcuffs. Charms bought from Duck Pond Crafts. I separated each handcuff and attached two of the "bracelets" to the bars of my "cage" after adding some chain lengths. This is, in fact, a tea-light holder that I felt fitted this perfectly. To say this was a bit fiddly is an understatement. It was all done through the bars and from underneath, lol - no door!!
Anyway,
The rest of the minions have some fantastic pieces to show you, both today and on Wicked Wednesday should you need more inspiration.
See you soon I hope
Enough of my ramblings and on with my piece for Haunted Design House
HDH152
"Chain me up, Chain me down"
"Chain me up, Chain me down"
You are to create a dark, Gothic, or Halloween-based art piece
that has something to do with
chains, shackles, bondage.
Kinky!!
The image I used for this is from Smeared Ink. From the Gothic Fairies collection - Vivadondra.chains, shackles, bondage.
Kinky!!


Anyway,
The rest of the minions have some fantastic pieces to show you, both today and on Wicked Wednesday should you need more inspiration.
See you soon I hope
Friday, 21 September 2012
Use Metal with Delicious Doodles
It's "Team A"'s turn this week for providing the inspiration over at Delicious Doodles' Challenges.
I used brads, chain and charms as my metallic bits on a collection of ATCs made into a matchbook. With just a tiny bit of wire as well.
The collection of images I used are the Halloweenies. These cute little images are on special offer at the moment - so if you're after a bargain - get on over to the Delicious Doodles shop. They are available singly of course, but who can resist a bargain? They are also available now in Rubber!! from Sweet Pea Stamps.
 and inside


 with this cute little imp on the back
All the images were coloured with promarkers, cut out and matted onto purple misted orange paper. A variety of embellishments as you can see. The only image that didn't get any metal is the Mummy. The base card is a purply colour really, but in different lights seems to take on a life of it's own, lol
We'd love to see your projects now. If you use a Delicious Doodles image you will get spotlighted and get more chances of winning - so what are you waiting for?
Hope to see you soon
A challenge or few I'd like to enter this into
D L Art - Halloween/fall colors or an owl or all
PaperPlay Challenges - Choose a Holiday - Hallowe'en for me
Creative Craft Challenges - Anything Goes
Anything metal will do, charms, chains, embossing metal, metallic card, whatever!
I used brads, chain and charms as my metallic bits on a collection of ATCs made into a matchbook. With just a tiny bit of wire as well.
The collection of images I used are the Halloweenies. These cute little images are on special offer at the moment - so if you're after a bargain - get on over to the Delicious Doodles shop. They are available singly of course, but who can resist a bargain? They are also available now in Rubber!! from Sweet Pea Stamps.


All the images were coloured with promarkers, cut out and matted onto purple misted orange paper. A variety of embellishments as you can see. The only image that didn't get any metal is the Mummy. The base card is a purply colour really, but in different lights seems to take on a life of it's own, lol
We'd love to see your projects now. If you use a Delicious Doodles image you will get spotlighted and get more chances of winning - so what are you waiting for?
Hope to see you soon
A challenge or few I'd like to enter this into
D L Art - Halloween/fall colors or an owl or all
PaperPlay Challenges - Choose a Holiday - Hallowe'en for me
Creative Craft Challenges - Anything Goes
Tuesday, 18 September 2012
Breaking News!!
An exciting new Challenge blog is being formed over at Sparkle and Glitter - The NEW Rick St Dennis Venture. We're still setting it all up but you can come and visit and follow so you can keep up to date with all the news. There will be prizes of course. Who can resist the chance to win digis from Rick St Dennis' shop?
Monday, 17 September 2012
Artistic Insanity? or just Insane?
For the narrative on this - get yourself over to Rick St Dennis' blog, it is so much better explained over there.
You can then decide for yourself whether that straight jacket and the men in white coats are really needed. Either here in Scotland for going along with the project or in California where the idea was hatched.

 The idea of turning this
and this
into this


You can then decide for yourself whether that straight jacket and the men in white coats are really needed. Either here in Scotland for going along with the project or in California where the idea was hatched.

 The idea of turning this
and this
into this

Not the easiest job I've undertaken. Taking a pic of a card made using acetate and miri card You should see the number of pics I discarded!!! The actual card does look amazing I have to admit. The different effects one gets just by looking at different angles makes it almost supernatural.
For those interested in knowing -
Silver miri card was coloured with alcohol inks

just random splodges of colour.
The appropriate images of the Op Art Monster were printed onto acetate and paper. The paper used as a template to cut out from the DP (Crafty Chaos Designs). The three layers of DP then acetate then miri were joined together. Mounted onto a dark blue cs base after edging with dst and then glittered.
We're Melting @ HDH
This week's challenge .....
The Minions, including our guest minion, Lady Brayton, have again produced an amazing array of eye candy to tempt you into joining in the fun.
I made two projects for a change.
The first was very quick and easy. Needing just a sheet of A4 paper, a piece of dst, a hot glue gun and some paint.


Printed and coloured with promarkers. Then black DI as a bg. Then scanned and printed onto cheap copy paper for the candle.
The cheap paper means no coating therefore the wax soaks in and the image becomes one with the candle.
 The box to contain the candle was made from a single piece of 12"x12" coredinations, TH distress collection. My MS drippy goo punch claimed overtime for the 4 layers of paper punched around the top while there is just the one strip of MS cobweb round the bottom. There is a strip of tattered angels crepe ribbon there as well - but I forgot to get a pic - I'll get one in a bit. Spellbinders labels 2 cut out Ms Witchy, after fussy cutting top and bottom so that they wouldn't get cut off.
The other minions have worked their wonders as I said. There will of course be more inspiration on Wednesday at the Haunted Design House blog should you need it. In the mean time - get melting peeps and show us what you can do
You are to create a dark, Gothic, or Halloween-based art piece
that has something to do with
melted wax, candles, witches, or melted flesh.
The possibilities really are endless with this one.
It's time to start tapping into your Halloween spirit,
and create something seasonally spectacular!
So many styles and so many techniques could be used here.melted wax, candles, witches, or melted flesh.
The possibilities really are endless with this one.
It's time to start tapping into your Halloween spirit,
and create something seasonally spectacular!
The Minions, including our guest minion, Lady Brayton, have again produced an amazing array of eye candy to tempt you into joining in the fun.
I made two projects for a change.
The first was very quick and easy. Needing just a sheet of A4 paper, a piece of dst, a hot glue gun and some paint.

A wand for all those budding acolytes of Hogworts.
The idea was gleaned from a book called "Dragonolia" by Chris Barnardo. Published by Little Black Dog Ltd. I think copyright means I can't publish pics on how to, but you should be able to get a copy from your local library at the very least.
My wand of rolled paper was painted black after the hot glue was used to fill both ends then drizzled around. The brush stroked over again when the paint was nearly dry to give a slightly textured look and feel. The hot glue on the central part was then dry brushed with copper paint with just a touch more at the ends.
My second project is a candle.
The image is Busted Down Witch from Rick St Dennis

Printed and coloured with promarkers. Then black DI as a bg. Then scanned and printed onto cheap copy paper for the candle.
The cheap paper means no coating therefore the wax soaks in and the image becomes one with the candle.

The other minions have worked their wonders as I said. There will of course be more inspiration on Wednesday at the Haunted Design House blog should you need it. In the mean time - get melting peeps and show us what you can do
A Colour Challenge for Smudgy Antics
Smudgy Antics has it's new challenge up
Use at least three of the colours in the sample below.
 Simple??
Which colours will you choose?
I went for all five of course. Well hard not to when there are 3 different greys, black and that pale lemon to lift it.
 I chose one of the Calaveras - sugar skulls.Number 4 to be precise.
Coloured with promarkers in shades of grey with black and just a hint of that lemon.

Use at least three of the colours in the sample below.

Which colours will you choose?
I went for all five of course. Well hard not to when there are 3 different greys, black and that pale lemon to lift it.

Coloured with promarkers in shades of grey with black and just a hint of that lemon.

I added some little black pearls to the cross and even smaller black pearls to those little dots above the teeth.
This was then mounted onto pale lemon card that was previously dry embossed with a leafy swirl in each corner. Dry brushed with black paint to grunge it up a bit and highlight the embossing.
Then the frame. Just one of those cheap second hand ones I pick up at local card boot sales. I painted black with some texture sand added. Then dry brushed with shades of grey and a touch of lemon. The leafy swirls are a sizzlets die cut from the same lemon card - just grunged up a bit with weathered wood DI. Some little flowers - white coloured with the same promarker as the image. Two pieces of a candle to mirror those in the skull eyes to complete the effect.
Your turn. While you're pondering - have a good look at my fellow DT pieces - aren't they fantastic!!
Looking forward to seeing your interpretation of this colour challenge.
Friday, 14 September 2012
Yet More Pumpkins
I had these images from Rick St Dennis coloured in, so just had to give them a home this week.
First up is The Pumpkin King.
I used the sketch from over at The SweetStop challenge blog

Coloured with Promarkers

Papers My minds eye - Halloween Sparkles and Authentique - Glowing
(think) go-create die
First up is The Pumpkin King.
I used the sketch from over at The SweetStop challenge blog

Coloured with Promarkers

Papers My minds eye - Halloween Sparkles and Authentique - Glowing
(think) go-create die
dewdrops, cobweb fabric and crown charm from stash
tassel and flower homemade


sentiment - computer generated
My second card is The Pumpkin Demon. A new digi this year from Rick St Dennis. Again coloured with promarkers.

This time following the sketch over at I{heart}2stamp.

Papers My minds eye - Halloween Sparkles
labels8 die cut
coredinations TH distress range with Design objectives embossing folder
other card/paper, dewdrops and ribbon from stash
pumpkin embellishment - homemade
I am entering these cards into the following challenges
Tuesday, 11 September 2012
A Little Witch Time
For this little Pumpkin Witch from Rick St Dennis, the promarkers came out again. just the oranges and greys though.

Then using the sketch over at Dutch Dare Challenges as a guide, this card was born.

The main DP is from My Minds Eye - Halloween sparkles stack, matted onto pearlised copper paper and over laid with 4 black/orange coredinations squares that have been embossed with a sizzix spiders web and sanded. The ribbon, cord and gems are from stash.
I'd like to enter this card into the challenge at
Dutch Dare Challenges - Their sketch
Monday, 10 September 2012
Oh My Gourd!!
Haunted Design House time because it's Macabre Monday.
So instead of upcycling a pumpkin, I upcycled a paper bag.
 Useful for "trick or treating" or just to keep as part of the décor.
The centre piece is an image from Rick St Dennis, Pumpkin Head.

I know he's from last year's collection drawn by Rick St Dennis, but he fitted so well into my theme. I think my promarkers loved him.
For the rest of the bag, my cricut came in handy. Both the DP base (My Mind's Eye, Halloween Sparkles) and the letters were cut using the Happy Hauntings cart. Mounted onto a pearlised black paper base. A little wooden skull and crossed bones from stash.
Your turn peeps, show us your gourd!! While you're pondering, have a look at all the other wondrous pieces my fellow minions produced. You'll find them all at Haunted Design House.
Check back in a couple of days time for more of my pumpkin related makes.
A challenge or two I'd like to enter this into
Anything But A Card - Anything Goes
Inspired by - photo inspiration - I went for colour
Smudger - Recycle
Pin and Tack : Spark your activity now - Anything Goes
HDH150
"Oh My Gourd!!!"
"Oh My Gourd!!!"
You are to create a dark, Gothic, or Halloween-based art piece
that utilizes, mimics, infers, or is otherwise obviously
gourd or pumpkin inspired.
We have a wonderfully creative and timely sponsor this week!!
Funworld's Floating Pumpkin Hangers

Unfortunately, in this area we have nothing I could use to demonstrate this fabulous piece of engineering, not even a melon, but I have got one and as soon as a suitable pumpkin substitute is available, I will be using for sure.gourd or pumpkin inspired.
We have a wonderfully creative and timely sponsor this week!!
Funworld's Floating Pumpkin Hangers

So instead of upcycling a pumpkin, I upcycled a paper bag.

The centre piece is an image from Rick St Dennis, Pumpkin Head.

I know he's from last year's collection drawn by Rick St Dennis, but he fitted so well into my theme. I think my promarkers loved him.
For the rest of the bag, my cricut came in handy. Both the DP base (My Mind's Eye, Halloween Sparkles) and the letters were cut using the Happy Hauntings cart. Mounted onto a pearlised black paper base. A little wooden skull and crossed bones from stash.
Your turn peeps, show us your gourd!! While you're pondering, have a look at all the other wondrous pieces my fellow minions produced. You'll find them all at Haunted Design House.
Check back in a couple of days time for more of my pumpkin related makes.
A challenge or two I'd like to enter this into
Anything But A Card - Anything Goes
Inspired by - photo inspiration - I went for colour
Smudger - Recycle
Pin and Tack : Spark your activity now - Anything Goes
Friday, 7 September 2012
Delicious Doodles are back - Celebrating
Delicious Doodles Challenges are back after our well needed holidays, complete with a whole load of new DT members - a REALLY talented bunch of ladies. Please make sure you've welcomed them and a bit of bloggie love is always appreciated.
The challenges have gone weekly, so even more chances for you guys to show us your wares.
The first challenge for this season is CELEBRATIONS. My card was made with a duel purpose. A friend's granddaughter's first birthday was yesterday and she wanted to mark this milestone with a special card. Would I please make one for her. The colour scheme was set and it had to be cute with a puppy. Of course it also had to be child friendly. So no big, loose embellishments! This is the card that transpired. I followed the sketch from Sketches By Carly.

The image is, of course from Delicious Doodles - Westie's First. An obvious choice for me, given the request, coloured with promarkers. The "1" was coated with glossy accents and holographic glitter embedded in it so that it won't "shed". When that was dry, the image was then highlighted with distress ink.
The papers are from the Neighbourwood paper stack. (This has so many papers that are ideal for young cards). Matted onto dark pink/purple card. The same card being used to cut the letters out using my cricut. The flowers are glued on and brads added for the centres. The ribbon is from stash. It was harder than I thought to keep it all simple and child friendly. It's so easy just to add "just that bit more"
Looking forward to seeing the delights that come out of your crafty area peeps, - get linking - but only one entry per person please.
A challenge I'd like to enter this into
Sketches by Carly - Their Sketch
JustWordz - Celebrations
Tuesday, 4 September 2012
Try Stamping on Tuesday - GDT spot
I was asked to be a guest on the design team for Try Stampin on Tuesday after my entry into their challenge a couple of weeks ago. Of course I would be honoured :)
The sketch was duly sent over. This one to be precise....
 My card
 Two stamps used here - the sentiment is from Tim Holtz, the flying man from a steam punk set from De Stempelwinkel. Both stamped onto white c.s., cut out and ink distressed the edges. The paper is from BoBunny - weekend market. Twine, ribbon and charm with brad from stash. Attached to a cream card base.
A really easy sketch to work with.
I know the regular DT have worked wonders as well and it's been a pleasure to have this opportunity to work with them.
The sketch was duly sent over. This one to be precise....


A really easy sketch to work with.
I know the regular DT have worked wonders as well and it's been a pleasure to have this opportunity to work with them.
Monday, 3 September 2012
TIC-TAC-TOE 3 IN A ROW
Monday comes around so fast, doesn't it! The new challenge over at Smudgy Antics this week is a "bingo card" type challenge.
Three in a row, across, down or diagonally from this little lot.
 What did I do?
I always have a problem with choosing which row to work with. This one was no exception and by the time I's finished decorating my little 7cm square canvas and counted it all up I found I'd used them all LOL.
 The canvas has been painted in grey (with some texture medium added) and a retired Smeared Ink spider web rubber stamp was heat embossed using silver with some silver glitter added to the powder to give a sparkly yet distressed look/feel to it. The gravestone is a cuttlebug die cut then dry embossed (comes as a set). This was also painted with texture medium added to the base paint, some dry brushing and a wash added to give more definition. Some web fabric behind this gives more texture. The little skull charm was eyeless so I stuck some little red gems into the sockets. This is surrounded by some little home-made ribbon roses. Then comes the main image....... One of the Calaveras Sugar Skulls. This was coloured with promarkers with a touch of gold gel pen and fussy cut out before attaching to the canvas with silicon glue.
Ok, I hope you've been to see the projects made by my fellow DT members and welcome to Shell as our GDT this month.
Looking forward to seeing your choice of elements this week.
I'd like to enter this into the challenge at
Anything But A Card - Anything Goes
Three in a row, across, down or diagonally from this little lot.

I always have a problem with choosing which row to work with. This one was no exception and by the time I's finished decorating my little 7cm square canvas and counted it all up I found I'd used them all LOL.

Ok, I hope you've been to see the projects made by my fellow DT members and welcome to Shell as our GDT this month.
Looking forward to seeing your choice of elements this week.
I'd like to enter this into the challenge at
Anything But A Card - Anything Goes
Bare Bones at HDH
No, you don't have to strip a body - just your projects - of all those little embellishments that most of us like to use.
Not as easy as it sounds, is it. So many will find this harder than normal, I'm sure. I know I had to struggle not to add more to mine!
I went for a simple black and white card.

You are to create a dark, Gothic, or Halloween-based art piece
that uses NO dimensional embellishments. That's right.
No rhinestones, no pearls, no ribbons, no chipboard.
Pretty much a clean and simple layout. It doesn't have to be
a single layer card, but no bumpy bits.
So are you up for the challenge?No rhinestones, no pearls, no ribbons, no chipboard.
Pretty much a clean and simple layout. It doesn't have to be
a single layer card, but no bumpy bits.
Not as easy as it sounds, is it. So many will find this harder than normal, I'm sure. I know I had to struggle not to add more to mine!
I went for a simple black and white card.

I used a skully/candle corner stamp that I found second hand on fleabay so don't even know where it's from
:( Any ideas peeps? I stamped and embossed in black before cutting that section out with a nestie. The "LOVE" stamp, also heat embossed straight onto the card, in black, is from the Andy Skinner, Gothic range.
The skulls square then attached to this card base. Finished. Wow, so quick, after I had decided what I was going to do that is.
You should see some of the fabulous examples my fellow minions have produced! Stunning is an understatement!
Your turn - come show us those bare bones projects at Haunted Design House so that we may marvel at them!!
I'd like to enter this card in the challenge at
That Craft Place - Black and White
Saturday, 1 September 2012
WOW!!!!
I have some exciting news.....
Rick St Dennis is recruiting some people for a design team to show case his images. After applying in the manner that was required, I received back some images to use, to see how I did.
After submitting my projects, I was informed that green was not a favourite colour. Oh well.
My "Trick or Treat" bag with I have a New Tooth - Dracula , who is only a little boy, wasn't dressed as a grown up Drac.


Little Dracula was coloured using promarkers with ink distressed edging and a trio of bat sequins.
I used the head from the Pumpkin Witch to decorate the closure flaps with some "boo!+ ghosty" ribbon..
The box itself is constructed from one 12"x12" piece of orange card. To decorate - die cut spiders from glitter card on both sides with "Trick or Treat" cut using my cricut and coated with glossy accents and some "Happy Halloween" ribbon from stash. The back has a larger version of the same cut. some bigger gems for the spiders eyes.
 The top is edged with black and lime green "drippy goo" punched card and the bottom with a fence.
 My second project was made using Hannah Halloween. I liked the look on her face but it did remind me of those that have had too much of the giggle water. What better way of using her than on a bottle tag?

The tag was made using papers from the Authentique - "glowing" stack. One of a selection of labels, my daughter bought for me on a trip to the US, added the description of the bottle contents. Some home-made "burnt organza" flowers, some charms and a length of chain to hang round the bottle neck finished this all off.
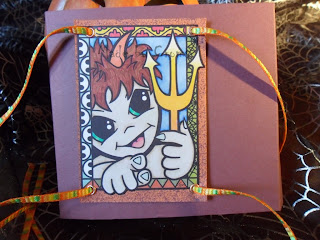
My third project submitted was a twisted easel card. I used Devilina for this project. She struck me as a fiery kind of a gal and that's how she was coloured, with reds, oranges and yellows. Promarkers with just a touch here and there with sparkly gel pens.

Some red distress ink to give that extra fiery glow aided by some red gems.
Some red lace stuck around the edge of a second, same size oval with the image panel stuck on top so that it's neat from the back as well.

Papers used are from Echo Park - Apothocary Emporium and BoBunny - Enchanted with a panel of embossed and distressed coredinations, all matted on torn hand made yellow paper. Some yellow and orange organza ribbon to blend the joins. The flowers are again home-made, using strips of the same ribbon and lace and are used to form the "stop". Some die cut swirls and the sentiment mat (seen just peeking out at the back) were cut from glitter card. All this attached to a black card base.
I'm looking forward to making a few more projects using yet more of Rick's fabulous images. Stay tuned..
Rick St Dennis is recruiting some people for a design team to show case his images. After applying in the manner that was required, I received back some images to use, to see how I did.
After submitting my projects, I was informed that green was not a favourite colour. Oh well.
My "Trick or Treat" bag with I have a New Tooth - Dracula , who is only a little boy, wasn't dressed as a grown up Drac.


Little Dracula was coloured using promarkers with ink distressed edging and a trio of bat sequins.
I used the head from the Pumpkin Witch to decorate the closure flaps with some "boo!+ ghosty" ribbon..
The box itself is constructed from one 12"x12" piece of orange card. To decorate - die cut spiders from glitter card on both sides with "Trick or Treat" cut using my cricut and coated with glossy accents and some "Happy Halloween" ribbon from stash. The back has a larger version of the same cut. some bigger gems for the spiders eyes.

 My second project was made using Hannah Halloween. I liked the look on her face but it did remind me of those that have had too much of the giggle water. What better way of using her than on a bottle tag?
The tag was made using papers from the Authentique - "glowing" stack. One of a selection of labels, my daughter bought for me on a trip to the US, added the description of the bottle contents. Some home-made "burnt organza" flowers, some charms and a length of chain to hang round the bottle neck finished this all off.
My third project submitted was a twisted easel card. I used Devilina for this project. She struck me as a fiery kind of a gal and that's how she was coloured, with reds, oranges and yellows. Promarkers with just a touch here and there with sparkly gel pens.

Some red distress ink to give that extra fiery glow aided by some red gems.
Some red lace stuck around the edge of a second, same size oval with the image panel stuck on top so that it's neat from the back as well.

Papers used are from Echo Park - Apothocary Emporium and BoBunny - Enchanted with a panel of embossed and distressed coredinations, all matted on torn hand made yellow paper. Some yellow and orange organza ribbon to blend the joins. The flowers are again home-made, using strips of the same ribbon and lace and are used to form the "stop". Some die cut swirls and the sentiment mat (seen just peeking out at the back) were cut from glitter card. All this attached to a black card base.
I'm looking forward to making a few more projects using yet more of Rick's fabulous images. Stay tuned..
Subscribe to:
Posts (Atom)