Showing posts with label Decoart. Show all posts

Tuesday, 30 July 2019

Another Box - Kind o' Industrial

Hello again peeps
I have another box for you today. I have so many bits of MDF left over from an old DT position (company no longer trading) and I really oght to get them used up. What better way than to decorate a few boxes needing a face lift from their original, boring, basic unfinished wood look?
This one starts off using the scraps of the embossed card stock from my previous posted box, plus a few other plain scraps. There are "straps" of yet more card scraps; shaped with scissors and holes punched, rivets are little gems. A bit of stencilling with decoart crackle paste and Andy Skinner's "snakes web" stencil. Then a layer of burnt sienna paint, then dry brushing raw umber all over.

the MDF bits were given a touch of texture paste in places before being painted silver then given a coat of crackle glaze and then antiquing cream in patina green, raw umber and red oxide. The creams then wiped back.


Some micro beads then in a few places for "that" look you get when pipes haven't been touched in years.

The sides were all given a stippled gesso finish before painting in the same burnt sienna paint, then dry brushing with raw umber.


Yet again - I never leave the inside unadorned - more prima paper - this time the ledger paper stack.


A bit of wax round the edges to make sure the paint doesn't stick when closed. before putting the hinges and clasp back on.

Saturday, 27 July 2019

July DT Project for A Inky Mess

Hi guys and gals.
I hope you are all dealing with your weather ok and not letting heat stroke take a hold. There are advantages to living in Scotland - among many other things - we seem to be getting 10deg C cooler than even England, so I would hate to live further south at this time. It's just comfortable here as far as I'm concerned.
My AInkyMess DT project this month comes in the form of a 14cm (across the parallel lines) by 9cm deep, hexagonal box.


The whole box was first covered with a dry exbossed card stock. Then painted silver after which I painted black Decoart antiquing cream. Wiped back slightly with damp kitchen towel. Then protected with satin varnish.
The "retaining bands" are more card, some small flat backed beads form the rivets, then all painted with burnt umber and quin. gold after some texture sand paste on some places before more black antiquing cream and wiped back before adding to the box.
The top was were the real fun lay.  Lots of TH cogs and a key - rusted up, some dry wall tape painted to look rusty, some rusty wire coils -  of which one is as a "barbed wire" (as inspired by my gorgeous friend Fiona Randall) and the other just a twisted wire. There are a couple of wooden laser cuts from my local craft shop (McOyster papercrafts in Cupar) that were given a rusty finish to match on there as well. A larger rusted home made coil of wire then that cute little light bulb from Artful Days.

Of course, I always finish off my boxes inside as well.
The paper I chose to use here is from the Prima "Timeless Memories" paper pad. Just the right kind of "worn" look for me.

I hope to see you all over at the AInkyMess challenge this month with your mixed media project.
Thanks for looking

I'd like to enter my box into the challenge
A Vintage Journey - Precious Metal

Saturday, 15 December 2018

Bleeding Art - A GDT spot

Hi everyone, 
I had some amazing news last month, my Halloween tags won me a GDT spot on the amazing mixed media challenge blog, Bleeding Art.  Picture the little happy jig I was doing.  Off went the email to the very talented Cathy Frailey to accept and back came the brief. "Shiny and Sparkly". Oh my!
I had a few loose ideas come and quickly go again. Those that know me, know that this kind of crafting doesn't come easily to me. I am happiest getting dark and grungy but I have been getting some practice in lately with the feminine look. With a daughter who is a true girly girl and granddaughter following in her mum's footsteps, I have had to take into account their tastes when making for them. 

The project for Bleeding Art that I finally decided on was a shrine/wedding arch for my daughter's wedding next year. 
Without giving too much away, this matches her colour scheme and the vibe she's aiming for.


I used a Tando Creative arch substrate that I was able to acquire at a recent "Ministry of Mixology" weekend. This particular kit is not in the shop yet but there're plenty more to choose from. It has been painted using Decoart media line and chalk paints/mediums to give a weathered look finished off with a clear wax to seal and for a bit of a sheen. 
Added lace and pearls from stash. The floor covered with hessian.
Threaded battery operated lights through the lattice for added shine and sparkle.


The bride and groom have been painted cream with a lustre medium added then a glitter medium through 2 different stencils. The little plinth the bride and groom are standing on was made from greyboard covered with paper then added the same lace, some ribbon and pearls to finish. Some little "diamond stars" stuck to the back. 


As I have had to keep this a secret, for obvious reasons, my daughter hasn't even seen this yet. I hope she approves.

A big "Thank You" to the ladies of Bleeding Art for allowing me to join them this month as a guest DT member. Looking forward to seeing everyone's entries into this month's challenge of  "Shiny and Sparkly"

I'd like to enter this into the challenge at
More Mixed Media Challenges - Anything Goes 

Friday, 30 November 2018

A Inky Mess - November

Sorry for being tardy on this - I was away from home and forgot to schedule - my bad

It's my piece made for the November challenge for "A Inky Mess" Challenge blog.

A small canvas using stamps and stencils from France Papillon. The Horses are from the "1800" stamp set, coloured with Caran D'Ache pencils.  The stencils are a mixture of her newest ones.

The words also are from France - "How Shall I Put It"

There are various paints and mediums used - all Decoart mostly from the media range including some interference paints.
The wooden stand is from stash

Please come along and show us your mixed media makes over at the Challenge blog and don't forget to leave my gorgeous teamies some love

I'd like to enter this into the challenge over at
Bleeding Art - Anything mixed media

Thursday, 25 October 2018

October "A Inky Mess"

Good morning everyone
It's the 25th and that means a new challenge over at "A Inky Mess" challenge blog.
This month we have the wonderful Gecko Galz sponsoring us so you know their prize is going to be fabulous.
For my DT inspiration I have used another substrate from Tando Creative. Not as mini as last month to be sure but this file holder is still only 13cm square.
I started of by using modelling paste through a stencil then painting it. (Decoart paints/mediums)


This is the file holder when closed

and open to show that the decoration carries on to the end
if you look very closely under the rice paper, to the left of that daisy, you might see the magnet that forms the closure on this. 

and the spine

I have used lots of bits and pieces from stash, ranging from some TH ephemera (inked round everything), some glass flat backs, some pearls from a cheap piece of costume jewellery and some micro beads. The gaudy green stone has some twine wrapped round to act as a means of opening the book without damaging the whole thing.
The stamped saying is from Sheena Douglass' butterfly collection, stamped on more rice paper.

It was so much fun making this, even though it's outside that zone of comfort which we all have. I think it does everyone good to explore other areas once in a while and I know it helps my mojo return after it has a little holiday.

Looking forward to seeing everyone's makes in this new challenge 

Wednesday, 24 October 2018

I Haven't Been Idle

I know that not many projects have made it to my blog in the last few weeks - that's because most of them were gifts and swaps with other crafters and I didn't want to show them publicly until they had been received. Well most have now made their destinations so I feel happy about displaying on my blog.

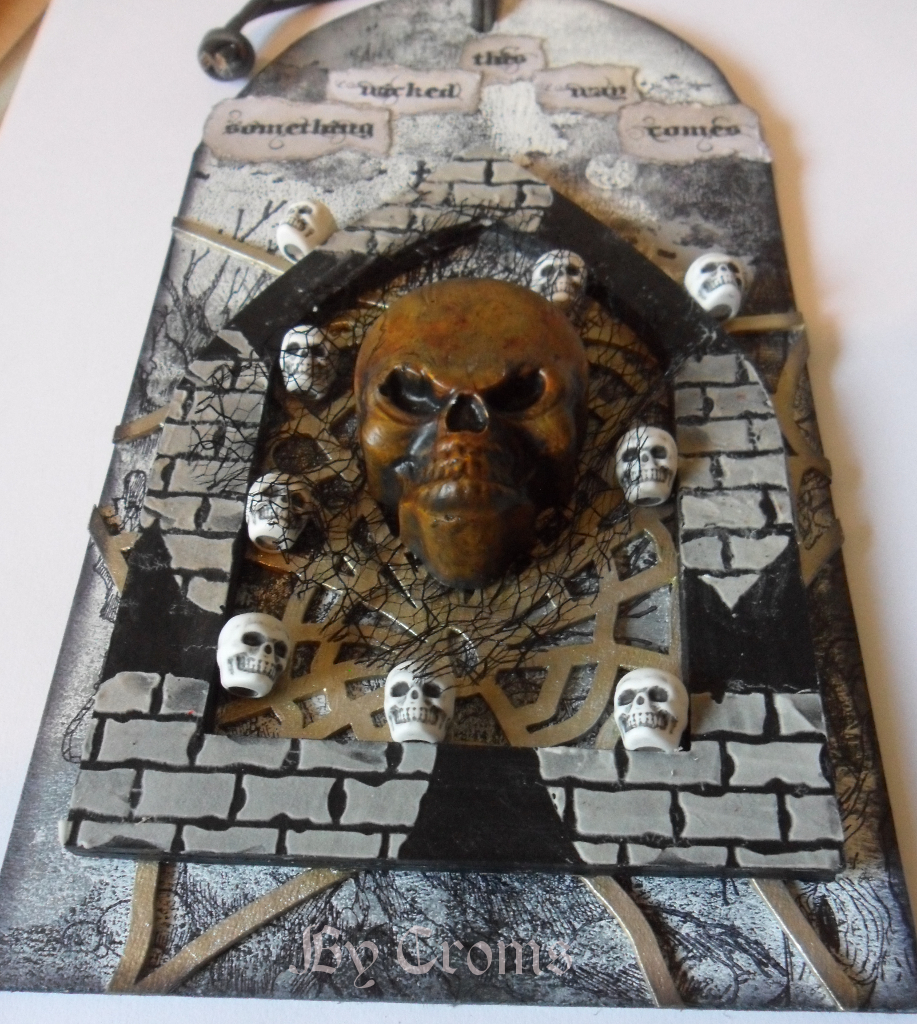
First up is a tag I made as a swap within a group on facebook called Mixed Up Mixer. A mixed media tag with a Halloween theme.
This was the one I made

A greyboard substrate with paint and inked images layered with more (Tando Creative) greyboard cut into an arch and one of Tando's spider webs and (Tando Creative) brick stencil with (Decoart) modelling paste. Some cobweb fabric under a painted plaster cast skull. A few plastic skull beads to finish

I think the dimension is better appreciated here

My second Halloween themed project is now safely in it's new home
This time a little hanging


The skull was painted at the same time as the previous one, so is a similar colour. This time the greyboard substrate was brayered with paint, colours ranging from dark grey through to white. Then stamped with archival ink using stamps from Andy Skinner, high lighted with white gel pen.  The ornate die cut is one from Tonic's mixed media range cut from greyboard. Painted black then a variety of interference paint colours. Layered with another cut from the same Tonic range again brayered with paint then script stamped. The cobweb diecut to give another element in my scene.
Finished off with some white artstones and some twine to hang the picture with.   

Thanks for looking

  
I'd like to enter the projects as one into the challenge at

Bleeding Art Challenges - Halloween Mixed Media

Tuesday, 25 September 2018

A Mini Mini Book

Good Morning everyone.
No, I haven't mistyped my heading. This truly is a Mini, mini book, measuring just 6cm square with a 2cm spine. It is my project this month for A Inky Mess as part of their design team that I have been lucky to be chosen to join.

This month we are being sponsored by Luna Girl, a treasure trove of digital vintage ephemera.
I have used "Bring your Wings" and vintage postcards 2 to make this little project.

The substrate is part of the mini book kit from Tando Creative together with a couple of small butterflies and Textures 1 from their thins range. Some decoart modelling paste on the diamond shapes, some small pieces of builders mesh between the butterflies then some decoart paints to colourise the front.  Some art stones adhered with heavy gel medium for a bit more texture. 


The Luna Girl images were adhered back and inside


with the book pages being a mixture of DP and the postcard images, attached with book binding glue to the ribbon covered spine.


A couple of brass charms completed the look. 


Please don't forget to take a look at the gorgeous projects my teamies have made using the gorgeous imagery from Luna Girl then come back to the A Inky Mess blog to enter your project so that we may come visit you.


Saturday, 25 August 2018

"A Inky Mess" Tag

Good Morning everyone
I have had a few weeks away and locked myself out of my blog, after all these years, now I can get this post up that I thought was prescheduled, I feel such a dafty.

I am here today with my first project, a tag, as a member of the "A Inky Mess" Design Team.

A fairly simple tag but with lots of layers.
The bottom part was started with some modelling paste through a France Papillon stencil (Rock Formation). When dry, a coat of paint to colour then a wash to bring out the texture. Then a piece of old book paper, again colourised with a wash of paint. Texture paste on the next layer with more paint both neat and as a wash before stamping with archival ink.  The picture frame was given a simple rusty effect with yet more paint then adhered to the picture base that was stamped onto a crackled substrate. A little word over a cambric layer under this. Some rusted wire shaped to form the means of "hanging" the picture with a tiny heart to hang from.

All stamps are from a range designed by France Papillon and made by Chocolate Baroque.
All paints and medium are by Decoart.

Thursday, 7 June 2018

Frangifantastic

Morning all

"What a strange title!" do I hear you say? Well it's one of the words on the stamp set "Perfect Words" by France Papillon for Illusionary artists produced by Chocolate Baroque. It so seemed to fit this tag.

The tag itself was started as a challenge to myself - after seeing the challenge set by the Mixed up Magazine blog design team. Bold colour!! Now for those that know me - this isn't something that comes naturally. I prefer to keep to the muted tones of black and brown. Getting out of your comfort zone once in a while has to be good to expand the creativity of anyone. So with this in mind - I started on this tag.

The tag itself is from the "Tagtastic1" and an element from "Flaming hearts" - both produced by Tando Creative.

The heart shape first because I knew I needed curing time. the main heart shape painted red, then crackle paint and then yellow. The heart frame attached and Decoart ultra thick poured into the hole. Leave alone and don't touch. More on this later.

The main tag
A layer of white gesso. The neat greyboard can be painted on directly but would have reduced the brightness of the colours. The using a soft gel medium to increase flow time more and Decoart media fluids I mixed with up a storm on the tag.
Patience - let it dry.

Stenciling and doodling
adding the stamped word matted onto some sheer orange fabric


There's a smaller tag here to mount the heart onto. The flames are orange and coated with a crackle medium 


The wings are made using hot wax into an Artyco Crafts mould. Coated with perfect pearls before Decoart gold interference paint.

Outside of my comfort zone - for sure. Do I like it? Yes I do. Will I come back into this zone again? - for sure - just don't ask when.


I'd like to enter this tag into the challenge at
Make It Mixed Media challenge - Bold Colour


Wednesday, 23 May 2018

I am a Winner .......... yayyyyyyy

A very good morning/afternoon/evening to you all. Are you all sitting comfortably? This is going to be a loooooooong post.

If you have been following any of my latest projects on this blog, you will have seen that a number of projects were aimed at the Illusionary Artists challenge being staged, The task was, using either France Papillon's or Andy Skinner's stamps in the Chocolate Baroque Illusionary Artists range, create a project (or seven). Link the project into one of several spots and be judged by both artists. The prize was a feature blog post on the respective artists blogs. No mean prize considering the bragging rights this affords as both are amazing professional artists (as well as being lovely people) and I have had the greatest pleasure in meeting them both and taking more than one class in the Ministry of Mixology weekends.

Well I am ecstatic, to say the least. France loved my little mini book featuring Auntie Margo and co and it was this project that secured this fabulous prize for me.
Please click the link above to read more about this project.

So what new projects to feature in this post on France's blog

I made a few, trying to feature not only the stamps but also the fabulous stencils designed by France and produced by Tando Creative. The first two projects because I wanted some storage for some of my goodies.
First was a little book case to house the mini books I'd already made. 


Decorated with crackle paste through the "Rockformation" stencil on the outsides before painting and inside paint through the "crackled" stencil on back and shelves and paint through the "torned circle" on the insides and stamped with crackle stamp from "Rock'n Rust" plate.

Next storage for those stencils.....or for the journals that France both encourages, teaches and inspires with the help of her special team of butterflies both on facebook and her blog.


Purely functional with just the moths from the "Creepers and Crawlers" plate. Stamped onto some brusho-coloured watercolour paper and cut out, with a bit of interest inside with heat embossed owls from Stampendous.

The purely functional projects done - some real playtime.


This acrylic tag went in the box of some very special items to France. I must give a shout out to Nikki Killinger for the backwards crackle technique. Such an awesome way to decorate any clear substrate.
On my tag I used the boy from "Auntie Maud & co." and the little hearts and sentiment from the "perfect words" plate. 

Another tag - just because

From the Tando kit "France Papillon Tags and embellishments", and using "Rock formation" and "Rusted rivets" stencils with crackle paint before painting. A dusting of stampendous embossing enamel. The newt was cut out from tissue paper and adhered with matt medium. The moth was stamped into hot glue, cut out and coloured with mica powders. Both stamps on the “creepers and crawlers” plate. The sentiment is from the "Perfect words" plate stamped onto part of the embellishments kit that was painted, treated with one step crackle and then English red oxide antiquing cream applied and wiped back. Rusty wire "holds" it all together with a little help from some 3D glue.

Finally 
as previously mentioned, France is very inspirational in the Art Journaling field as well as Mixed Media. It is because of her that I actually started my very first art journal after all these years of not understanding "WHY". Anyone who has not done any art journaling and is still dithering really needs to go and get stuck in. The “A layer a day, a spread a week” approach is really working for me and I know I'm not alone. I won't bore you here with my spreads done so far but one of the prompts was "Shadow of the morning". This next piece evolved whilst playing with decoart sosoft fabric paint with this prompt in mind.


You can see the "rusted rivets", "circles", "torned circle", "crackle" and "rectangles" stencils all being used before stamps from "Rock'n Rust", "Perfect Words" and Auntie Margot and co" make an appearance. This piece of fabric has been used to cover a 3x3 signature booklet made from A4 envelopes I have, that were bound, coptic style.
the fabric adhered to the envelopes and machine stitched round the outside

I hope you enjoyed looking at these projects almost as much as I enjoyed making them and I thank you for your endurance.

Once again, I want to thank France for not only choosing me as her guest on her blog but for being such a wonderful and inspiring lady.


All the paints/mediums are from Decoart 
(except the brushos and mica powders)

All the stamps, stencils and more can be found in France's shop


Wednesday, 11 April 2018

Little Things

Morning all
I hope the weather where you are is better than here, cold and damp is an understatement. Middle of April and anyone would think that spring is still ages away.

More pain management therapy here in the way of crafting. It does help me and I know it helps others.  I made a tag. A mini canvas in a way that is bigger than an ATC so more can be thrown at it.

The tag is from Tando Creative. Their greyboard is second to none, so many mediums can me thrown at it and it always stands up to them. Decoart mediums and paints for me - never disappointed with the quality.


For this one I started out by attaching some corrugated card torn from a packing box. Some grey board strips - had to soak the greyboard with water to get this to tear - with the first layer of modeling paste. Next I mixed up a bit of the modelling paste with some texture paste for the next layer through a France Papillon stencil (Rusted Rivets) then some crackle paste. I had in mind some old tree bark and the mixture of textures that you get on some old trees subjected to years of whatever mother nature hurls at them with a touch of man-made pollution thrown in.

Next - loads of different paint layers - both in the form of neat paint and washes until I had the effect I was happy with. Sealed with three layers of matt varnish

A France Papillon moth stamp from the Chocolate Baroque Illusionary artists range Creepers and Crawlers coloured with water colours.

The words from the same range but the Perfect Words plate. The words were stamped onto cream velum and torn out before attaching.

A faux leather cord and done

Thanks for looking

I'd like to enter my tag into the challenge at

Make My Monday #68 - Things with wings
A Inky Mess - Anything Mixed Media Goes

Thursday, 5 April 2018

Broken Time

Morning all
Managed to escape the kisses and cuddles from our dog Nala for 5 mins. As much as I love them, it's hard to type a blog post or craft when 20kg of staffie is needing her fix of her hoooomans on a lap.

Soooooo, what have I got today?
A little plaque. Substrate and bits from Tando Creative with the stamped words from the Andy Skinner side of Illusionary Artists stamps from the Word Up plate made by Chocolate Baroque and the background stamp of the Clock Collage from Stampendous as is the Aged Ochre embossing enamel on the word frame. Decoart paints/mediums used.


The base and frame were first painted with black chalk paint then crackle then vintage and timeless paints respectively.  A little bit of rubbing back to show that black a bit more before stamping the clock collage in sepia archival ink.
The cogs and "clock hands" given various coats of paynes grey and quin. gold media paints. The clock hands started life as keys but as I had no clock hands, I improvised.

The clock dials had texture paste used before the paints.

The word plate - the frame was triple embossed then Andy's word stamp from the stampendous "steampunk" set pressed into the hot enamel with versamark.
To get those words to fit nicely with more control , I pressed the painted greyboard piece onto the stamp as opposed to stamping onto substrate. A couple of brads to complete then all glued together.

Thanks for looking

Sunday, 1 April 2018

A Toxic Plaque

Good afternoon and a Happy Easter to those that celebrate it.
Crafting is not only enjoyable for me, it also forms part of my own pain management. Drying time can be made to fall into those periods when I need to lie down so I have a win win situation most of the time. For those out there, and I know there are many, BIG gentle hugs to you all.

It's been a week since my last visit. I've been busy but can't share my makes just yet as they have not been received by the people they are intended for.
The piece I am going to share with you came about by chance really. I was searching for a particular roll of ribbon that I need for another project and came across a little package of MDF and grey board that was in a goody bag at one of the Ministry of Mixology retreats that I love going on. This bit donated by Tando Creative. It seemed to good an opportunity to put it to some use as this ribbon has still not come to light.


I started off by damping the edges of the greyboard and distressing thoroughly. Then left to dry.
All four pieces were painted with Decoart black chalk paint and when dry some crackle medium applied to some areas. Lighter coloured chalk paint in different colours applied to all pieces.
Rust effect - more paints. The stamp set I used is from Andy Skinner's stampendous range - "Toxic". It felt good to go back to some older stamps for a change. Why buy stamps if they are going to be used a few times then put away, never to be seen again, just because newer toys are at hand?
Some close ups of those distressed edges - they are solid now because I've sealed with ultra matt varnish.


The scratch and "toxic" stamps used here can be clearly seen.

The rivets are just aged brads. 


The finished plaque can be hung up with the rusted wire. The smallest piece is going to hang funny because it's already lost two rivets so no - I didn't mis-stamp.


Thanks for looking 

Saturday, 24 March 2018

The Birth of a Journal

Morning all.
The story really starts back in February.  I bought an "Art Journal Starter" kit from Tando Creative at a weekend workshop retreat with the lovely Di Oliver and the equally talented Andy Skinner. The purchase was, in the back of my mind I suppose, prompted by another fabulous artist by the name of France Papillon. She teaches not only mixed media but also how to explore your inner self through Art Journalling.  I have always used my crafting as a means of pain management and I am going to need it following an accident that has me in more pain than my fibro alone. This also followed the death of my father and there were some emotions that needed to come out and I really found that creating a journal page helped me on this. At the time a loose page was created with a view to adding it to a journal when I had one. I don't know if this one page will ever be added to this particular journal as I'd like it to be a happy place and leave that particular page shut in a drawer for now. Time alone will tell. So............

The Birth of This Journal
A daunting task when journalling has not been an avenue previously explored. Where to start? Well to build the book was the obvious starting point. I won't bore anyone with the hows on this. All the instructions came with the kit, including needle and thread to hand sew the signatures up and into the framework.
The next fun part was decorating.
First the cover.
A coat of white gesso - always a good starting point. Various colours of Decoart paints in the green/blue range with a bit of some browns thrown in. Stamping next. The newts in the "Creepers and Crawlers" plate and a stamp from the Rock 'n Rust plate, both from the Illusionary artists range (the France side of the collaboration) from Chocolate Baroque.
The back cover just has no newts. The green at the bottom - that's the octopus tendrils to form some weed.
The inside front cover. The second layer of a piece of napkin adhered and blended in with the butterfly and moth from the creepers set and highlighted with pan pastels

Inside back cover
The front piece of that napkin on a piece of water colour paper to form a pocket. A bit more stuck in to top corner for balance. The pocket is not stuck down here to show the stamping and paint "drippage". The hearts are made using crackle paste through stencils from Tando and France. Again - all paints and mediums from Decoart. The contrasting purple - because that has always been one of my "go-to" colours and a prompt of back to basics was also influencing this area. That stamp "said something to me" - from France's own shop last year.

Back to basics also features in my first and opening page. How far back? Well France also has the numbers 1957 on the stencil used on the inside back cover. It's that one element that sealed the purchase for me. The year I was born. This was done on the "other piece created when making the back cover pocket. 

  
Other elements apart from the paint. Some tissue paper and a piece of washi tape that stamps from France were sent wrapped in last year. Some stencilled areas with crackle paint. Some bubble wrap stamping. A piece of paint coloured cambric. Words and hearts from the Perfect Words plate from Illusionary Artists.

That's it for now in my journal.
Thanks for looking


I'd like to enter this journal page into the challenge at
The Artistic Stamper - Stencils and Masks