Showing posts with label SteamPunk. Show all posts

Tuesday, 1 March 2016

Things To Alter - SteamPunk - Time Captured

A very good morning to you all and a bit of special news from me.
If you look back to my last post you'll see me "wax lyrical" about a new crafty company on the block

"Things To Alter"

Well, I am a lucky girl, I have been asked to join the DT and am amid the company of many very talented ladies. A trip over to the challenge blog to see their work will prove my word.
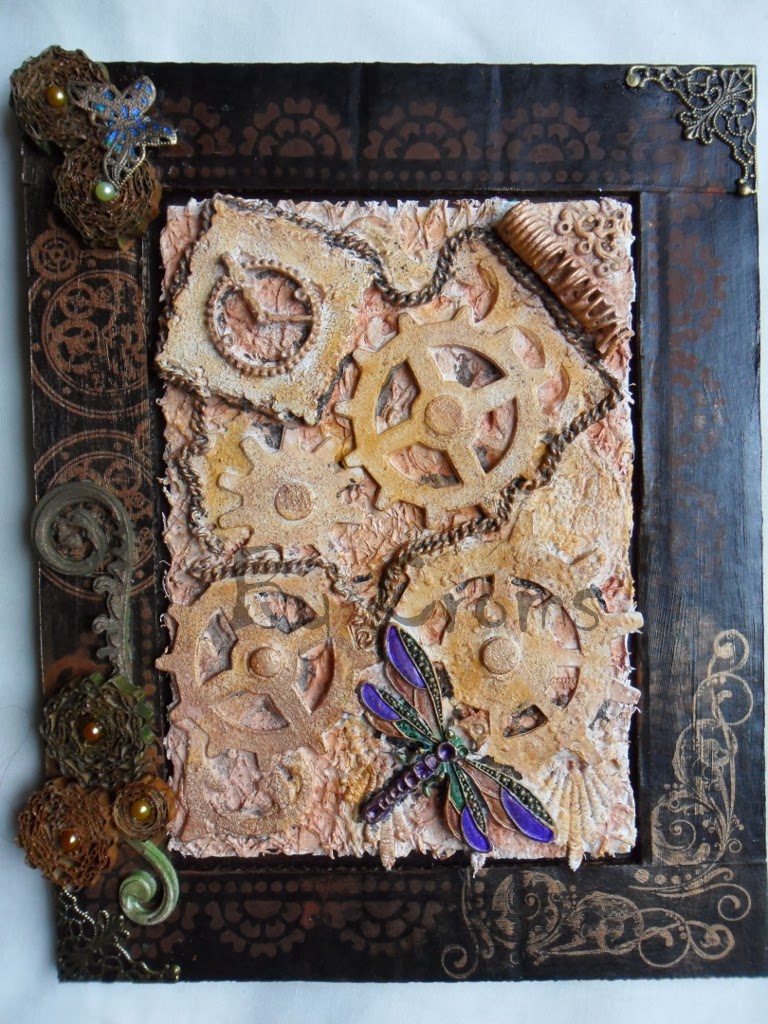
My first project was made before I found out what the theme was this month. Maybe I ought to put "psychic" in my C.V. as it just happened to fit. - STEAMPUNK.

I used a number of different items....
just one of the birdcages available
two of the clock hands
some of the cogs

front view

back view

Everything was painted first on the inside with Decoart Americana Burnt Orange paint.
The roof pieces were secured together with a bit of wire wrapping after being covered with a green crackled effect paper (got to use those scraps up)

The rest got paints applied to them (Decoart)


also a touch of gold wax on the numbers and some mica dusted onto the dragonflies

The clock fit just right into the birdcage (of course I tested it before all the work painting)
There you have it - 

Time Captured

I'd like to enter my project into the challenge over at
SanDee & Amelie's Steampunk Challenges - Steampunk/Industrial

Monday, 11 May 2015

Time for a Bit Of SteamPunk

Good evening people.
I just had to make this. My imagination was flying away with me.
I had the good fortune to visit the Sincerely Yours Craft fair yesterday. One of the traders there was The MDFMan. If only I had more pennies!! So many gorgeous MDF items for sale! I plumped for a clock with various cogs. As well as a couple of skull sets that needed a good home.

What did I get excited about?
Well this is my version..........

............and the story of how it came to be.

Out came the Decoart paints etc and everything was given a coat of black gesso to seal.
As the large face was dry first - that got the first treatment. A thin coat of deco-page and a sheet of paper from the Prima "Time Traveller's Memories" pad. Well stuck down before cutting down and then sanding. Finishing the edges with a brushing of "vintage paper" distress ink. Then with the Decoart stencil "Timeless Treasures" and some copper "Dazzling Metallics", added the numbers for the clock, off-setting the primary numerals. The image of the timepiece and wings is using 3 of the stamps from the Visible Image "Time After Time" set.
Next up the larger cogs that came with the collection
They were daubed with a few colours of the Decoart Americana paints. Antique Rose, Antique Teal Pansy Lavender and Traditional Raw Sienna. When dry a thin layer of Decoart Media Raw Umber Antiquing cream rubbed on before over stamping with an IndigoBlu crackle stamp.using stazon.
The small cogs were coated with Decoart Americana burnt umber mixed with Decoart texturizing medium. Then dry brushed with butterscotch and a bit more copper.
some glossy accents, brads, a length of chain. It's beginning to come together.
Needed something else..........
Those Visible Image stamps again. This time several wings, left and right, stamped onto kraft card and cut out decoupage fashion and layered up. Stuck together with silicon glue before triple heat embossing. My melting pot is no where to be seen tonight. The clock face stamped onto dark brown and heat embossed with white. Applied to the clock with more silicon glue.

I had to be careful all along the way, ensuring that minute hand was not going to be impeded on it's journey around the face and several times had to change the placement of those cogs before finally sticking down. The joys of practicality!

Thanks for looking and hope I haven't bored you with all the details

I'd like to enter my clock into the challenge at
Love2Create - Anything Creative / Mixed Media / anything goes
That's Crafty - SteamPunk Surprise

Friday, 1 May 2015

Progressive Challenge with Rick St Dennis

Good morning peeps
I hope the weather where you are is treating you better than in my corner of the world. We have seen several seasons in an hour lately let alone 4 seasons in one day. Weather ranging from warm sunshine all the way through to snow, rain and hailstones, and you should have heard the thunderclap Wednesday night! Oh my, I thought the roof was going to cave in! We are still here though, hanging on.
Enough of my prattle and on with the main reason for this post.

The first of every month sees the start of another episode to the Progressive Challenge being held over on the Sparkle and Glitter blog of Rick St Dennis. May is the start of a new 2 month stint where Anything Goes, as long as it has a Rick St Dennis image from either of the Zibbet or Etsy stores.
As part of Team A it's our turn to host the first installment.
My project uses the images Jocasta and Jarrod
Both coloured with promarkers then scanned into my computer so that I could shrink down to the size I needed them. ie about 2.5 x 1.5 cm. No way could I colour them that small without a microscope.
Why so small? To fit onto a couple of travel dominoes measuring 3 x 1.5cm.

 The dominoes were first covered with scraps of DP from prima "The Archivist" pad. Then the images, after fussy cutting out, applied with a touch of glossy accents before covering all with a good coat of glossy accents. Set aside and leave to dry.
Whilst they were put aside I could concentrate on the base.
A wooden watch shape frome Indigo Blu. Painted first with Decoart Black paint front and back. Then for the back, a layer of  Decoart "weathered wood" then dazzling metallic in copper.

The front was covered in more of that paper from Prima and ink distressed with brushed corduroy.
Some metal charms and chain attached with more glossy accents and those altered dominoes secured with yet more of this amazing multi purpose medium. A couple of pearls added to the dominoes - just because!

The chain that was used can also double up as a means of hanging this small decoration.

Thanks for stopping by.
Looking forward to seeing your projects over on the Sparkle and Glitter blog.

I'd like to enter this little whimsy into the challenge at
Dream in Darkness - Anything goes (as long as it's not cute)
Create and Inspire - Anything Goes
Crafting From The Heart - Anything Goes

Monday, 14 April 2014

SteamPunk Junk with Haunted Design House

Oh I had such fun with this project. Even if I did get a blood blister on my thumb! Ouch! My colouring hand to boot! All for the sake of my "art"
This project started life as a dingy old lamp but I loved the shape. Then along came this challenge and it seemed made for my base.
The challenge in question was for Haunted Design House.

SteamPunk Junk

Well, it's not necessary to go rummaging in the bins - but to use something that would be thrown away by any "normal" person. A bit of up-cycling is the name of the game.

This is what I came up with


and yes it is functional

Covered with a multitude of chipboard cogs, some chain and wire coils then a few coats of paint of varying thickness (a bit of sand added to the first coat for added texture).
Then came the decoration of the panes
All the designs are painted using glass paint
 There were stamped images that each design was loosely based on. Mostly from Ali's Inky Fingers with a bit of Creative Expressions. The images stamped onto paper under the glass then interpreted for ease of painting the outlines.

Your turn - what piece of junk can you turn into steampunk art?
Looking forward to seeing those pieces at HDH.


I'd like to enter my lamp into the challenge at
Left of Centre - Anything LOC /Dark Themed
Craft My Life - Anything but a Card
Through The Purple Haze - Anything Goes
Quirky Crafts - Mixed Media
That Craft Place - Anything Goes
Sandee & Amelie's SteamPunk - Use a favourite Technique ( geez I have so many)

Tuesday, 1 April 2014

A Little Bit of SteamPunk

Good morning folks
I have been working on some projects now for a few weeks and neglecting my blog and a few other things besides. The projects are now finished and although I showed the biggest time consumer on facebook, I have yet to blog it and the sister project made.

They will both be published in Just Steampunk, Volume 5 on sale in August from Scott Publications, 

First is a tote bag I made, from scratch. Just a collection of rectangles of cotton fabric stitched together, but I now have a decent sized craft tote to take what ever I need to my weekly craft club meetings. Plenty of pockets was my main aim and this has been achieved.
The decoration - the main image on the front flap is from the pen of Rick St Dennis. A new image created for me by the man himself. "A Clockwork Pony Cart" can be found in Rick's Zibbet shop and as a download from the Etsy shop.
I hand coloured the image first with a mixture of Graph It and promarker pens with metallic elements painted on using perfect pearls.
then scanned into my pc so that it could be printed onto the fabric transfer paper (Crafty Computer Paper).
The image cut out and ironed onto the front panel of my tote. Then, using a stencil from Creative Expressions and some copper fabric paint, was given a frame.

The handles for the tote were also stencilled using the same stencil and paint. The pockets on the side were decorated with another stencil, this time from "Splodgeaway"

The "sister" project, one that the original hand coloured project could be used on, also features another of Rick's new Steampunk images, Professor Coppelious. Also available as a download from Etsy. He also was coloured with a mixture of Graph It and promarker pens with metallic elements painted on using perfect pearls.
I had to flip him so that he fit my scene
Applied both the images to a canvas that was previously covered in black gesso them stencilled using glossy dreamweaver stencil paste and the same Splodgeaway mask as on the tote.
A mask made using a TH "weathered clock" die cut and some copper pan pastels over this. The stencil itself then was applied, why waste it? Some balloons, by prima,were stencilled as well using a mix of gold and sienna pan pastel.

The "time travel" letters are thickers from American Crafts.

I'd like to enter these projects into the challenges at
Through The Purple Haze - Steam Punk

The canvas I'd like to enter into the challenge at
Pan Pastel/Premium Craft Brands challenge - Metallics

Thursday, 6 March 2014

More Die Cuts - With a Diifference

No posts for ages then two in as many days - and more tomorrow - but you'll have to wait for that.
Little story behind this. I belong to a local craft group and each week try to expand our crafting knowledge by each member "teaching" their particular skill to the others. To be honest - there are some weeks when we all make a lot of noise and very little crafting is done - but we have fun!!!! What to do on "MY" week?
Some thing I've only dabbled in but it's fun and each project grows until the eye says "Stop!"
A mixed media canvas using diecuts, bits of broken jewellery, scraps of lace, the netting from some oranges, some scrunched up foil from a Christmas chocolate santa (I keep the weirdest things), coiled wire and a charm. All of this was applied to a canvas board 18x13cm using heavy gel medium and painted with white gesso.
 Looks a bit uninteresting without colour?


Using panpastels and luminarte radiant rains paints the transformation is complete.

Then I had to make a frame, didn't I?
None available in my stash of the right size. So I made one from a very sturdy cardboard box.
The back - I forgot to take a pick before applying the black gesso. (Just to prove)
lots of black gesso allowed to dry before decorating.
 The cog mask is from Creative Expressions
The cogs and flourish stamps are from Indigo Blu
 The flowers are made with more of the corrugated card. Thin strips wound up into a tight spiral and painted with luminarte radiant rains with a pearl centre. 

 Butterfly from stash
Metal corners from stash

and the final picture fully framed

I'd like to enter this into the challenges at
Left Of Centre - Use die Cuts
Craft My Life - Anything goes but no Cards
Frilly and Funky - Stencils and Texture
Pan Pastel / Premium Art Brands - Frame It

Friday, 18 October 2013

Day 18 of 31 Days of Hallowe'en with Delicious Doodles and RSD

For full deets on this Freaking fangtastic Blog hop organised by Smeared Ink and The Smeared and Smudged forum, please hop on over to Terra's blog. All the info on the days sponsors are there as well as any other info you think you might need.  The blog hop roll is there in my side bar.

Good morning folks

A double billing today for just two of the fabulous sponsors of this wild fiesta.

First up is my DT project for Delicious Doodles. It's Team A's turn to host the challenge this week at the Delicious Doodles Challenges.
This week the challenge is to make a Hallowe'en project that is NOT scary. No freaky Zombies or grisly remains. No frightening ghoulies or Vampires turning in their graves. Well I think I managed that. With the help of Gothicka. A brand new image that you should be seeing in the shop tomorrow.


Isn't she a stunner!!!
Here she is on the card made with her. In a SteamPunk type setting using G45 papers from the Steampunk Spells stack. Even down to her own little book of Steampunk Spells. That book was made with scraps and the front cover stuck on.

The cogs were given a coating of frantage EP in Aged Hunter and Aged Marine. Some purple and teal feathers, some chain to make sure that book isn't appropriated by the "wrong sort" and a couple of charms.
The card base and the image edges were given a dusting of copper pan pastel for that little bit of shimmer.

The second offering I have for you today is an image from Rick St Dennis.
An image that has been in the vaults for a while
We have Hedwig the Witch. Airless Chambers has many more versions of this little lady and  her sister Hannah. As well as an amazing project from Lady B!!  There is also a special purchase offer there valid for only a few days. You don't want to miss out, do you?


I'd like to enter my Delicious Doodles, Gothicka card into the challenge at

SanDee & Amelie's Steampunk Challenge for October - Tic Tac Toe (Centre horizontal line - Texture, Wings, Gears)
Your Next Stamp Oct Challenge - Sketch and photo inspiration

Tuesday, 15 October 2013

Day 15 of 31 Days of Hallowe'en

For full deets on this Freaking fangtastic Blog hop organised by Smeared Ink and The Smeared and Smudged forum, please hop on over to Terra's blog. All the info on the days sponsors are there as well as any other info you think you might need.  The blog hop roll is there in my side bar.

Good morning. Almost half way through this fiesta. Thank you all you Horrifying Hoppers for the kind words you have left so far, they really do help the soul to keep going.

Today I bring you a project made with an image from one of the sponsors for today - Simply Betty Stamps.
The image is from the Steampunk Zombies and Creeps section in the shop. This is Vampire Portrait.

 The base of the clock (Indigo Blu) was destined for another project that never came to fruition. How fortunate. I painted it first with Decoart Metallic paint in copper. Drew round a plate to get the circle from G45 - Steampunk Spells DP and stuck down.
The minor numbers of the clock are piles of watch parts glued together with glossy accents.
The primary numbers are mini dominoes adding up to the appropriate figures.

 The Vampire image was coloured with promarkers before cutting out and edge distressed with ink


The sentiment is from Prickly Pear. Stamped onto kraft coloured card, die-cut out and matted onto a complimentary die-cut in burnt orange.

Once again, I thank you all for looking and for your fabulous comments
See you tomorrow with a project using yet another fabulous image from yet another of our gracious sponsors. Can you guess which one?

Monday, 16 September 2013

Who Are You Supposed To Be?

I'm taking the title of my post from that of the new challenge started today over at Haunted Design House. Why not? It's better than my cold be-fuddled brain can come up with right now. The challenge is
 You are to create a dark, Gothic, or Hallowe'en 
based art piece that depicts a costume or
character you have been, or want to be for Hallowe'en.  

Isn't there that one costume you always remember
fondly from your childhood? Or maybe that one character 
you've always wished you had the guts 
(or the money, or the body)
to portray at this year's costume party?

We're being sponsored by
They have a varied selection of images from various artists.
Something for everyone.

We have chosen to work with the new Hallowe'en images
designed by Rick St. Dennis.

I chose to use Steampunk Peg. Not coloured in the normal brown tones I might have done if this were "normal" Steampunk, but in black, greys and purples as befits the Halloween season. 

Some of you might be interested to know what's been used here. First - there are no designer papers used, just diecuts and dry embossing on the actual tag base. The attached TH cogs were dry embossed with a cog folder to the tag base embossed with a watches folder. Some black DI brushed over lightly. 
The top is decorated with black and different shades of purple drippy goo punch outs. Some black lace added and some eyelets punched. The eyelets were threaded through with black satin ribbon that also held in place the charms chosen.

Peg herself was coloured with promarkers and fussy cut out. The tulle of her hat given a light dusting of DI to remove the white glare.
The wings from the Smeared Ink,Quoth the Raven rubber set were heat embossed in black on more purple card and some black feathers stuck behind. Peg was attached to these. 
Some more tulle was added to Peg's hat before attaching her to my tag.

If I could - yes I'd do the whole Steampunk "Thing". LOVE the clothing although it could not be on a full time basis for me, unfortunately.

Now it's down to you - What are you choosing to depict yourself as for Halloween this year? Or have you a hankering to re-visit a costume of days gone by? Come show us over at Haunted Design House in the next couple of weeks

I'd like to enter my tag into the challenge at
Challenges 4 Everybody - Anything Goes
That Craft Place - Things with Wings
Colour Creative - Anything goes
Simply Steampunk Challenges - Layers

Thursday, 29 August 2013

Funky? What's funky?

Morning all.
The ongoing weekly challenges over at Through The Purple Haze had me reaching for the dictionary. Week 7 and the challenge title is "Funky Girls and Boys" !!
Well the first definition was an unusual theme to say the least
1. a. Having a mouldy or musty smell: funky cheese; funky cellars.
b. Having a strong, offensive, unwashed odour.
They can't mean that. I looked on further... relating to Music
2. a. Of or relating to music that has an earthy quality reminiscent of the blues.
b. Combining elements of jazz, blues, and soul and characterized by syncopated rhythm and a heavy, repetitive bass line.
ok and reading the last bit......
3. Slang Earthy and uncomplicated; natural: "At the opposite end of Dallas's culinary spectrum is funky regional fare" (Jacqueline Friedrich).
4. Slang
a. Characterized by originality and modishness; unconventional: "a bizarre, funky [hotel ] dressed up as a ship, with mock portholes and mirrored ceilings over the beds" (Ann Louise Bardach).
b. Outlandishly vulgar or eccentric in a humorous or tongue-in-cheek manner; campy: "funky caricatures of sexpot glamour" (Pauline Kael).

Food for thought. Well the sponsor of the challenge this week is Kenny K so I went with section 2 - music - hence the music DP and the colour blue in this card and section 4 - unconventional with a caricature of sexpot glamour.
Kenny K does draw quite a few girls that fall into the category of sexpot glamour. I opted for one of the Steampunk girls - Lady Victoria. Coloured with promarkers.
I teamed her with some steampunk papers from the chronology range from docrafts and a piece from the DCWV heritage stack. Opting for an unconventional blue and brown/rust colour scheme and using the sketch over at Sweet Sketch Wednesday as my inspiration.


The flowers are a mixture of paper flowers and copper coloured cog die cuts in my stash with copper brads to attach. Ribbon and lace also in stash. The sentiment was stamped onto some little arrow diecuts that were then coloured with blue DI.

I am entering this card into the challenge at
Through the Purple Haze - Funky Girls and Boys
Sweet Sketch Wednesday - Their Sketch
Sweet Stamps - Birthday


Thursday, 1 August 2013

Tonight?............ Maybe

A few days ago, I was sent a couple of images by Rick St Dennis. He knows I love Steampunk and it was suggested he draw more of this genre. Oh lucky me when these arrived in my email. A joy to colour!
We have Angelique the Assassin and her would-be beau Angus MacPunque


I wanted to make a project that had both characters on it but not a card (for a change). I also need some more pages in the art journal I've started. This page kinda grew around the images and in-keeping with the challenge over at "Musically Challenged" where the music video inspiration is Tonight, Tonight by The Smashing Pumpkins. The video is set in the Steampunk era for those that haven't seen it.


The base paper is a music sheet from the DCWV heritage stack. (Love this stack!) On top of that are images taken from a CD, MCS Tinkering With Steampunk. I don't have that many craft CDs but when I saw this going cheap, it sounded like a good buy for the odd images. Some crinkled white tissue paper, mod podged on and a couple of Steampunk images from De Stempelwinkel, stamped in white. More texture needed. A bit of hessian for Angus and some green ribbons for Angelique.
Then the searching started for some chipboard letters. They are in this craft room SOMEwhere. I tidied them away the other day. They are in THAT safe place. The one I can never find until too late. Oh well. Time to improvise. In my searching, I did find some peel-offs I forgot I had, it's been so long since I have used them. I spelled the word "tonight" out using a promarker and dotted them on. In your dreams Angus. Hahaha.

So there we have it - my first collage.

I'd like to enter this into the challenge at
Musically Challenged - Tonight, Tonight by The Smashing Pumpkins
Divas by Design - Favourite Colour Combo (green and brown is just one of them)

Friday, 24 May 2013

Steampunk for Delicious Doodles

Morning peeps. I hope that everyone is safe following the horrific events of this week, both at home and abroad.
It's been a fickle week with the weather here in Scotland. With heavy snow, hail, rain and sunshine all in the space of a few hours, it's hard to decide what to wear let alone plan ahead a few days.
I have not done a great deal of crafting this last fortnight due to DH and his recent stroke but I am happy to report that he is improving, if only slowly. I only wish that the extra stress didn't have such an impact on my fibro, oh well, that's life!

Any way, I have spent a bit of time in my crafty area and come up with a card for the new challenge this week over at Delicious Doodles. The theme this week is STEAMPUNK.

A simple card from me though.

I have used the new "Steampunk Mermaid" and the "Steampunk Corner", both from the Delicious Doodles shop. The layout of the card was based on the sketchy over at Sweet Sketch Wednesday.

Coloured with promarkers before masking and brushing distress inks. Some copper paint to highlight the metal rivets, tail struts and corner cogs. Then matted onto burnt orange and brown.
The BP is from the docrafts "chronology" range, matted onto brown and blue.
The corner cogs are TH diecuts that have been heat embossed with marine frantage enamel in parts for a distressed look.
More diecut cogs in the bottom right of the mermaid, this time from the chronology range.
A copper coloured and blue rikrak ribbons with a couple of punched fleur de lis. Some pearls to finish.
The words "happy birthday" stamped onto another, smaller TH cog diecut.
.
Get those fantasy, time pieces, cogs and metallic bits together and make a steampunk themed project. Then come and link it into the challenge blog so that we can ooohhhh and arrrrrrrrr over it.

I'd like to enter this into the challenges at
Sweet Sketch Wednesday - their sketch
C.R.A.F.T. challenge - colour combo (blues and browns)
Crafty Bloggers Network - Tic Tac Toe. The row I chose was gems, stamp, ribbon