Saturday, 25 April 2015

Playing with Inks

Seems so long since I got rally inky! It's not really but it seems like it. These are my fingers after several washes so it might be a few more days before flesh colours return.
So much fun though and not that unusual in my crafting endeavours.
What caused them to be this delicate shade of blue?
Inks - dye based, of course, and glossy cardstock. Playing and making an ATC.
Using Haunted Places 1 and Killer Bo-Peep rubber from Smeared Ink. 
The sad news that Smeared Ink is closing the shop as of May 5th was like a body blow. They have been around longer than I have been crafting with stamps and it was a happy couple of years that I spent on their DT. The Smeared & Smudged community lives on in Facebook, thank goodness, under the watchful gaze of a couple of friends - Black Dragon and Shelley Knight. If you like the edginess of Smeared Ink - you better get in quick!

I'd like to enter this ATC into the challenge at
Smudgy Antics - Anything Goes with SI stamps

Tuesday, 21 April 2015

An "Irish" box card

Hi everyone.
This is a card that I put together ..... then realised it openes up "the wrong way". Oh well.... good for a left handed friend,  hahaha.
I used an image called Carmen from Rick St Dennis.
Coloured with promarkers, her hair was an experiment in Aubergine and dark blues. Love how it came out.
Then to use her for a card.
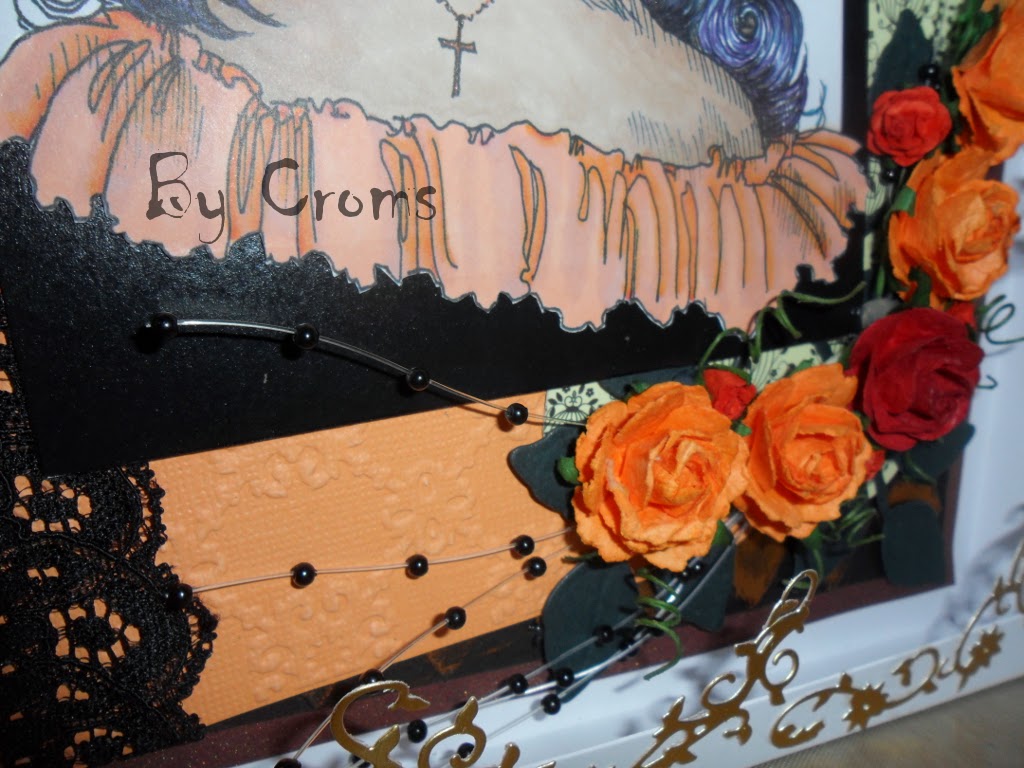
I used a box card format. This enabled me to use some of the many 3-d flowers that have been sitting in my stash for eons.
Many die-cuts in gold card to decorate the frame
 Some embossed black card rubbed over with gilding wax, More embossed card in a peachy colour, some black lace, a scrap of DP (Noir et Chic) some black pearl sprays and roses in dark peach and red with some die cut dark green leaves
 All mounted onto a bronze/golden base
The box card houses all this comfortably.
Then it dawned on me........... OOOppsssss
Yes - It opens the wrong way!! Too late now - it's just like the last pages of a book instead of the front.  I hope the recipient doesn't mind.
The front cover - The same bronze/gold  as the base of the card with the negatives of one of the diecuts and gilding wax. Sorry about the glare but you get the gist

That's it from me for  today.
Thanks for looking

I'd like to enter this card into the challenge at
Chocolate, Coffee & Cards - Use a diecut
Passion for Promarkers - Spring Blooms - use flowers

Friday, 17 April 2015

A Jacobs Ladder with De Stempelwinkel

Play time, for a change, in the Cubbyhole today. De Stempelwinkel have a (fairly new) challenge blog now and I keep meaning to join in. Time then runs away and before I know it the next challenge has started. Ooops. Anyway - a few hours was mine today and this is what emerged after the inking, gluing etc.
Several De Stempelwinkel stamps used. Nearly the entire plate of Animal Skeletons (plate 33) as well as some from Dark Night (plate 42) and also some odd ones I have in my collection.
A Jacobs Ladder ....

Picture heavy, sorry.

front cover made by "tiling" some DP with trees and two inside tiles. The first using gilding flakes the second with pan pastels


 more inside plates. The first two with gilding flakes the last with pan pastels


  Last 3 stamped inside plates and more gilding flakes


a LONG project to see in it's entirety but I hope you get the idea. Extra plates made from tiled DP paper.
Play time over, I hope you like this. Already my son(26) has spent longer playing with it than he thought he should. **little giggle**

I'd like to enter this into the challenge at
De Stempelwinkel Stamps challenges 8 - Nature


Monday, 6 April 2015

Going Green - with HDH

Haunted Design House has a new challenge starting today and with all the greenery that spring brings as well as the thought of new life got twisted about as only the Minions can do......
The theme then turns into
Turn Green (with envy)

So with the thoughts, maybe, on bringing new life into an old and battered piece of "junk" or a project that has mainly the colour green in it or ......... you get the idea. 
Susan has more ideas over on the blog. Her narrative is inspiring!!

My project ....
the upcycling of an old coffee tin
from this
 Then a piece of glossy thick paper daubed with different distress inks in shades of green.
This was then coated with the soot of a cheap candle
 Various stamps from the "Fringe" collection from Smeared Ink were then stamped into the soot.
After a couple of coatings of cheap hairspray to set.....
the paper was cut to size and wrapped around the tin,
The top and bottom coloured with alcohol ink (promarker)
then the final touch - a circle of grunged up paper with yet another element of the stamp set used and stuck down to the lid

A scrap of ribbon to neaten and that coffee tin now feels at home on my craft desk.

Your turn now
Go visit the HDH blog for more inspiration on upcycling etc and show us what you come up with

Monday, 2 March 2015

Stand In The Naughty Corner with HDH

Starting month three of our new monthly format at Haunted Design House - this time it's about those corners, with a twist if you want to use, that of Naughty/Nice.

It was left (almost) to the last minute here. Birthday weekend meant not so many hours in the craft room so the twist went out of the window.

A battered old cigar box that has been waiting for a makeover was my canvas.
A bit of sanding to remove the splintery bits then some Decoart Americana paint in Red Violet along the edges that would not be covered in embossed card. (Darice - crackle).
With that dry, the card was painted with Decoart Royal Purple America paint first then some dry brushing with Mulbery and Wild Orchid.

The corner embellishments are cut from black card using a spellbinders Gold elements one set.
This set embosses as well as cuts. Some Decoart Metallic Lustre in silver was added with a trusty finger and buffed up before attaching to the box. Some tiny black pearls added to resemble rivets.

The silver lustre was also lightly added to the painted edges. The side corners were not left out. A sizzlet die to the rescue. More silver and pearls.
The inside was covered in a piece of DP with Decoart Decou-page in the antique finish and the whole thing sealed.
Now I just need to find my box of catches to add that finishing touch and allow the box to be in a totally finished state,

I'd like to enter my altered cigar box intoi the challenges at
Altered Eclectics - Altered Item - March
Country View Challenges - Anything Goes

Sunday, 1 March 2015

March Progressive Challenge with Rick St Dennis

Oh My Goodness - March already? Where did February go?

Being the 1st day of March, the new Progressive Challenge starts again over at the Sparkle & Glitter Blog. I'm on Team A therefore it's our turn to make something. The theme this month is Easter/Spring using a Rick St Dennis image from either the Zibbet or the Etsy shops.
I made a "little" origami box with lid using this video on youtube as inspiration using a sheet of 12"x12" double sided paper.

The image that takes centre stage is Daffo Dill Fairy


Torn out and mounted onto some bright yellow card

The lid has beed slightly adapted and is attached with a card hinge so that it doesn't blow away. 
Well we have been having some really strong winds lately


Some ribbon threaded through so that it can be carried by little hands
Just need to get the Easter eggs to go in it and that'll be one Easter gift finished

Thanks for looking

I'd like to enter this little paper basket into the challenge at
Country View - Anything Goes for the 2nd blogversary
Crafts Galore - March - Anything Goes

Monday, 16 February 2015

Carnival with Paint and Feathers

Ok - onto my project - following on from the last post with DecoArt paints and other products.
A large project for me - a 30x40cm canvas.

Image from the shop of Rick St Dennis - Carnival 2015
Coloured with Graph-It pens

canvas
Primed with DecoArt White Gesso

Paints used
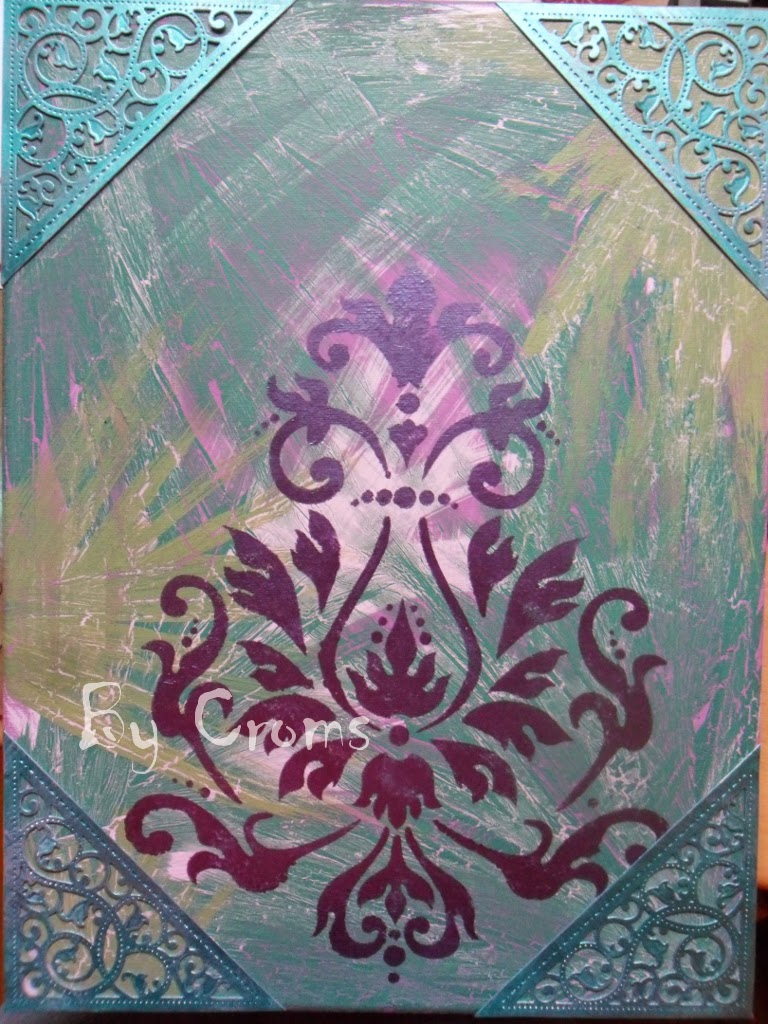
Americana Teal Green, Jade Green,Wild Orchid, Royal Purple
Dazzling Metallics Teal, Amythyst

Weathered Wood
Matte Medium

Stencil - Brocade Motif

Other products - Spellbinders Gold Elements one
peacock, and other feathers in pale green, lilac and purple/dark green
Purple gems 2mm
stardust stickles
glossy accents
Beads - peyote stitched lilac seed beads with added faceted AB crystal effect beads

First layer of paint was the Royal Purple, swirls of Wild Orchid followed. When dry, a coat of weathered wood, applied thinly for the fine crackle effect. A two colour combo of Teal and Jade greens slightly watered down (50:50)for the top coat.
Go to bed so I can't touch until dry!
The stencil and the Amythyst come next
 mmmmmmmm yummy 
together with the corner die cuts - painted with the Metallic Teal and dry brushed with diluted Wild Orchid , applied with glossy accents
oops the middle WAS there - oh well

Feathers added using the Matte Medium as a glue and the beaded element to conceal the ends and add an extra touch.
The image was fussy cut out and stickles applied - even on her body stocking. Glossy accents to her shoes.

the image was applied to the canvas with more Matte Medium.
Final touch was the tiny 2mm gems to the corner elements

The canvas - that's going to be hung in my living room - once the decorating has been finished,
Sorry about the glare from the shiny metallic paints

I am entering this into the challenge at
Design Team Showcase - This project is both for Rick St Dennis and DecoArt